So, you’ve got your eye on a capsule filling machine, but all the technical jargon or diagrams feel a bit overwhelming? No worries. We put together this guide to help you understand the machine in clear and straightforward language.
You might be wondering, “What if I’m using a manual, semi-automatic, or fully automatic capsule filler?” No problem. This guide covers all of them.
If you want to get a better grasp of your equipment to produce high-quality capsule products, stick with me. By the end, you’ll know the core components of different capsule filling machines and how to maintain them for reliable performance.
Why Knowing Capsule Filling Machine Parts Matters
No matter how simple a capsule filling machine looks, you still need to understand what each part does to operate it properly.

First, getting familiar with the parts helps you troubleshoot issues faster. If you know which part is which, you can identify what’s wrong with the machine. For example, if your capsules aren’t closing properly, you know that the first thing to do is check the locking mechanism or alignment plate.
Second, it makes maintenance easier. You’ll have a clear maintenance schedule in your head. For instance, check the tamping pins daily and give them a deeper cleaning once a week.
Third, it helps when you talk to manufacturers or service technicians. You can describe problems more accurately. You’re able to say “the auger in my powder hopper messed up, and it needs repair” instead of a vague “the powder isn’t coming out of the hopper.”
A little technical knowledge reduces downtime and saves you money on unnecessary service costs. On top of that, it ensures smooth production and consistent capsule quality.
Types of Capsule Filling Machines and Their Key Assemblies
Each type of capsule filling machine has a distinct set of core assemblies. Let’s quickly compare them:
| Machine Type | Key Assemblies/Parts | Typical Output | Best For |
|---|---|---|---|
| Manual Capsule Filler | A range of plates and hand-operated tools. No electric or pneumatic parts. | A few hundred to a few thousand capsules per hour | Small batches: Startups, small brands, pharmacies, clinics, R&D labs |
| Semi-automatic Capsule Filling Machine | Hoppers, orientation & separation unit, filling station, closing mechanism, vacuum system, control panel | Around ten thousand to fifty thousand capsules per hour | Small to mid-scale production: Growing brands, home-based workshops |
| Fully Automatic Capsule Filling Machine | Hoppers, feeders, orientation unit, vacuum separation, dosing system, locking and ejection stations, PLC & HMI | From forty thousand up to over four hundred thousand capsules per hour | High-volume continuous production: Contract manufacturers, large pharma and supplement brands |
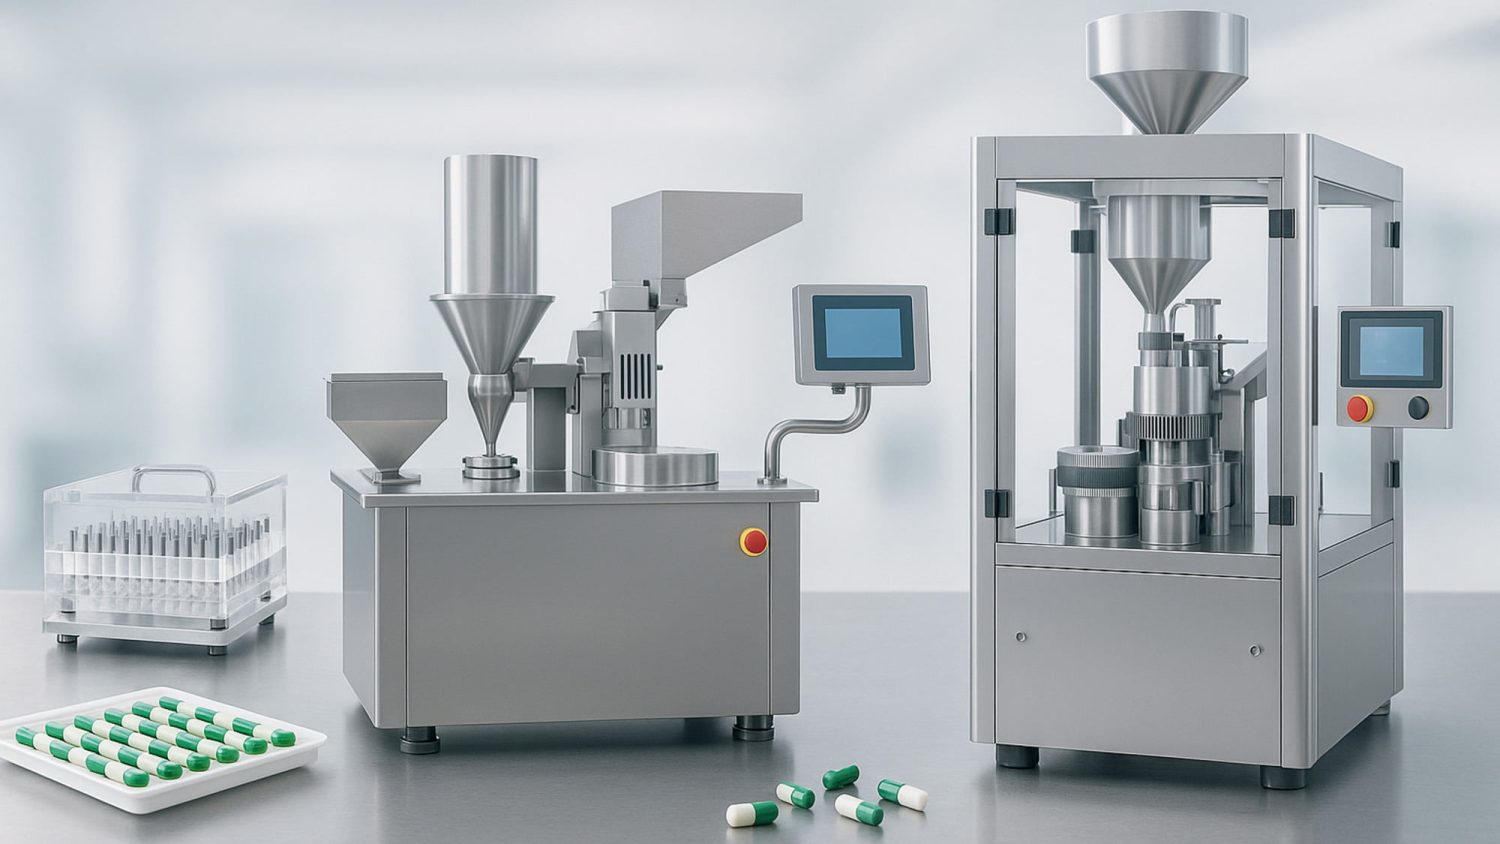
Manual Capsule Filling Machine Parts And Their Functions
Manual capsule fillers are the most straightforward. Every component is easy to spot at a glance and has a clear role. Common designs use plastic or acrylic plates with a fixed number of holes, usually 50, 100, 200 or 400.
To get the filler ready to work, you need to assemble these plates. It’s a bit like putting together LEGO bricks. Here are the key components of a typical manual capsule filler and what they do:
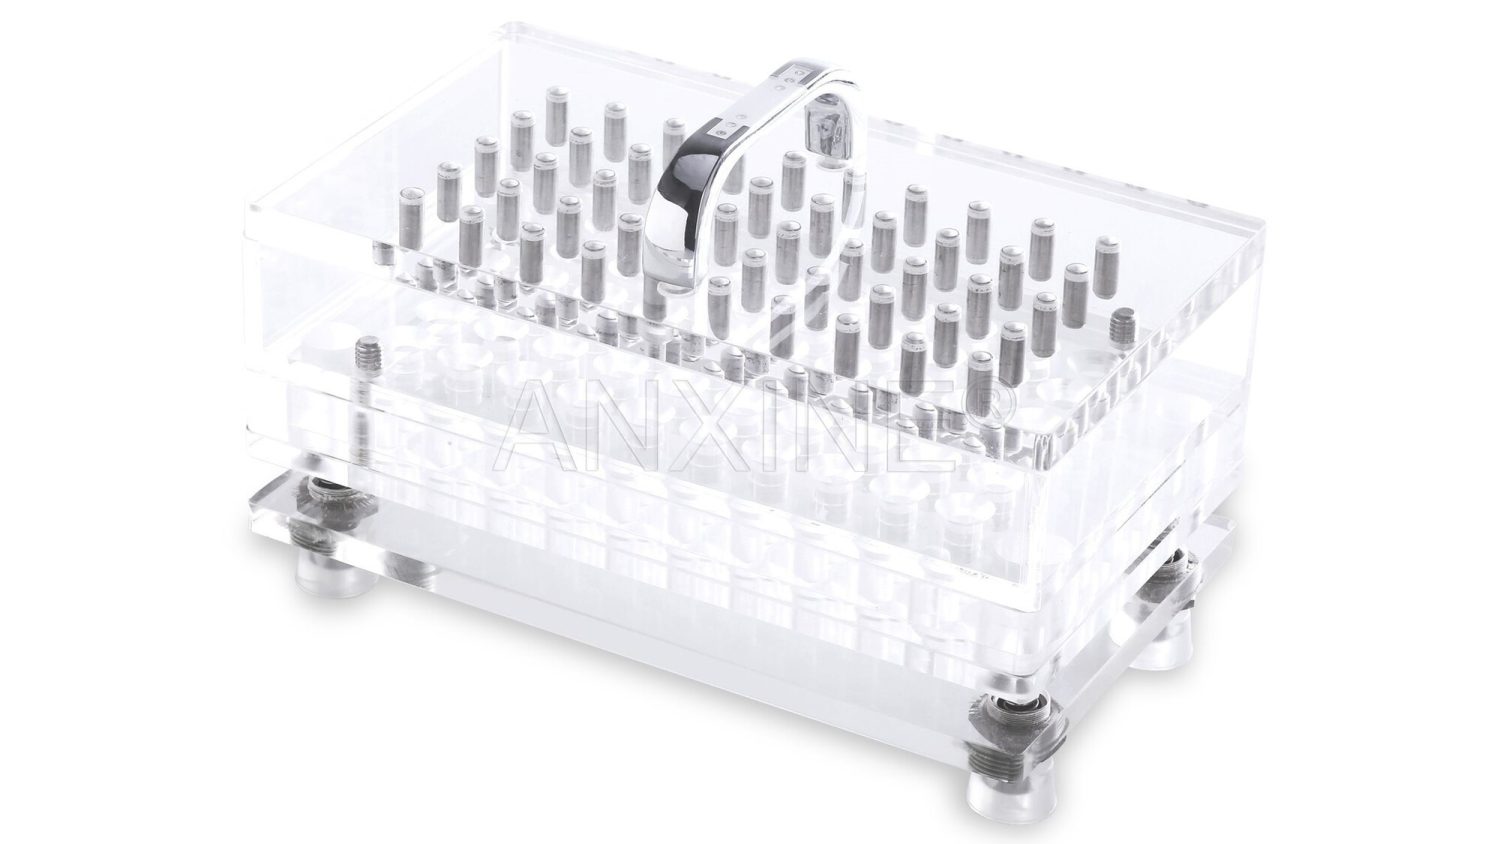
1. Cap Plate
As the name suggests, this plate is used to hold empty capsule caps. Yes, in a manual filler, the caps and bodies are already separated in the first place.
The cap plate features a lot of evenly spaced holes. The number and hole size can be customized based on the capsule you’re filling.
Just pour a bunch of capsule caps onto the plate and shake them until each hole catches a cap with the opening facing up.
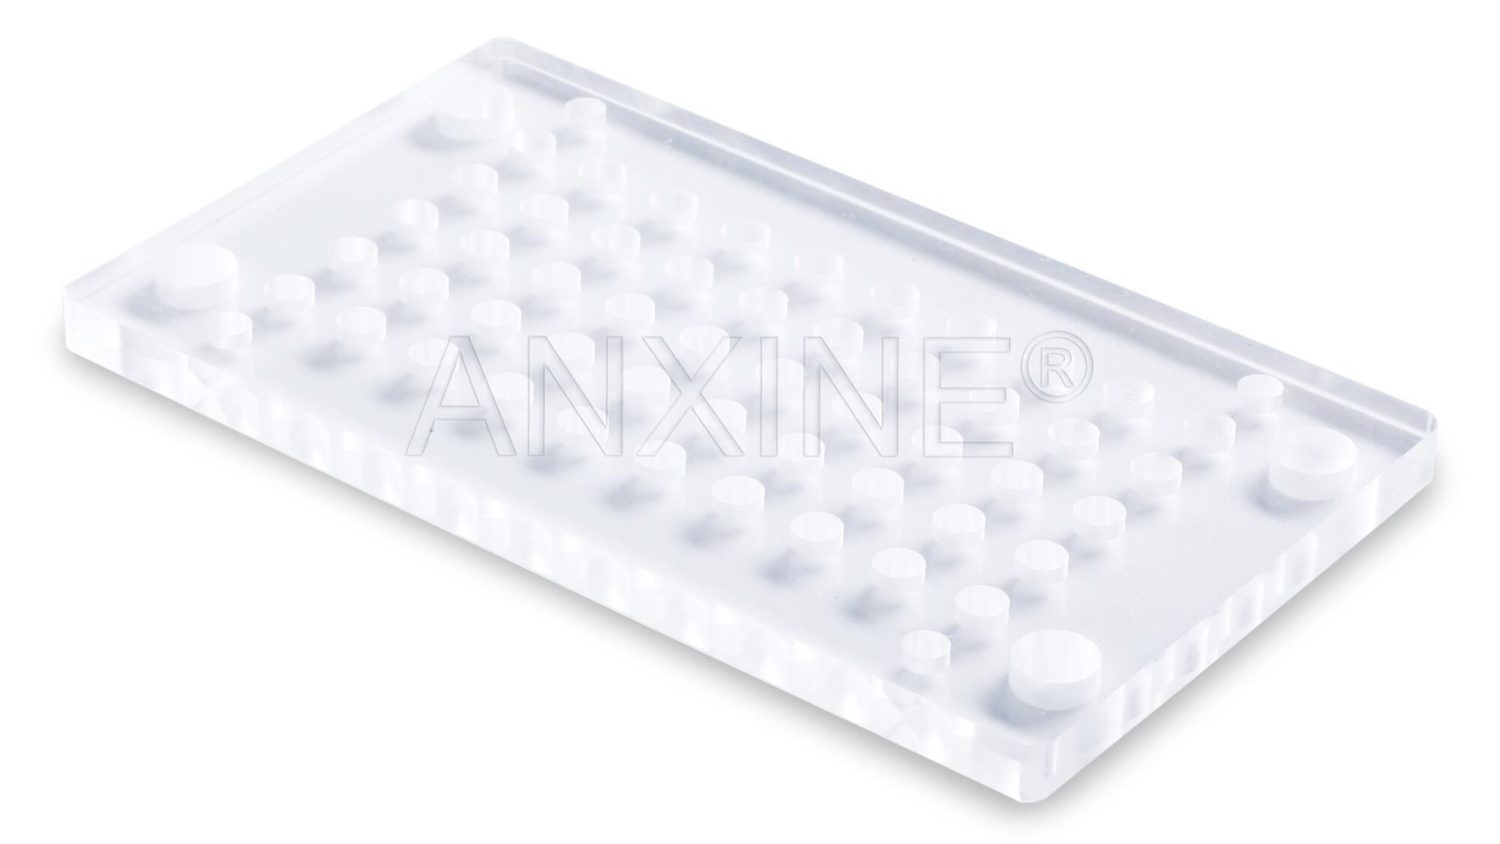
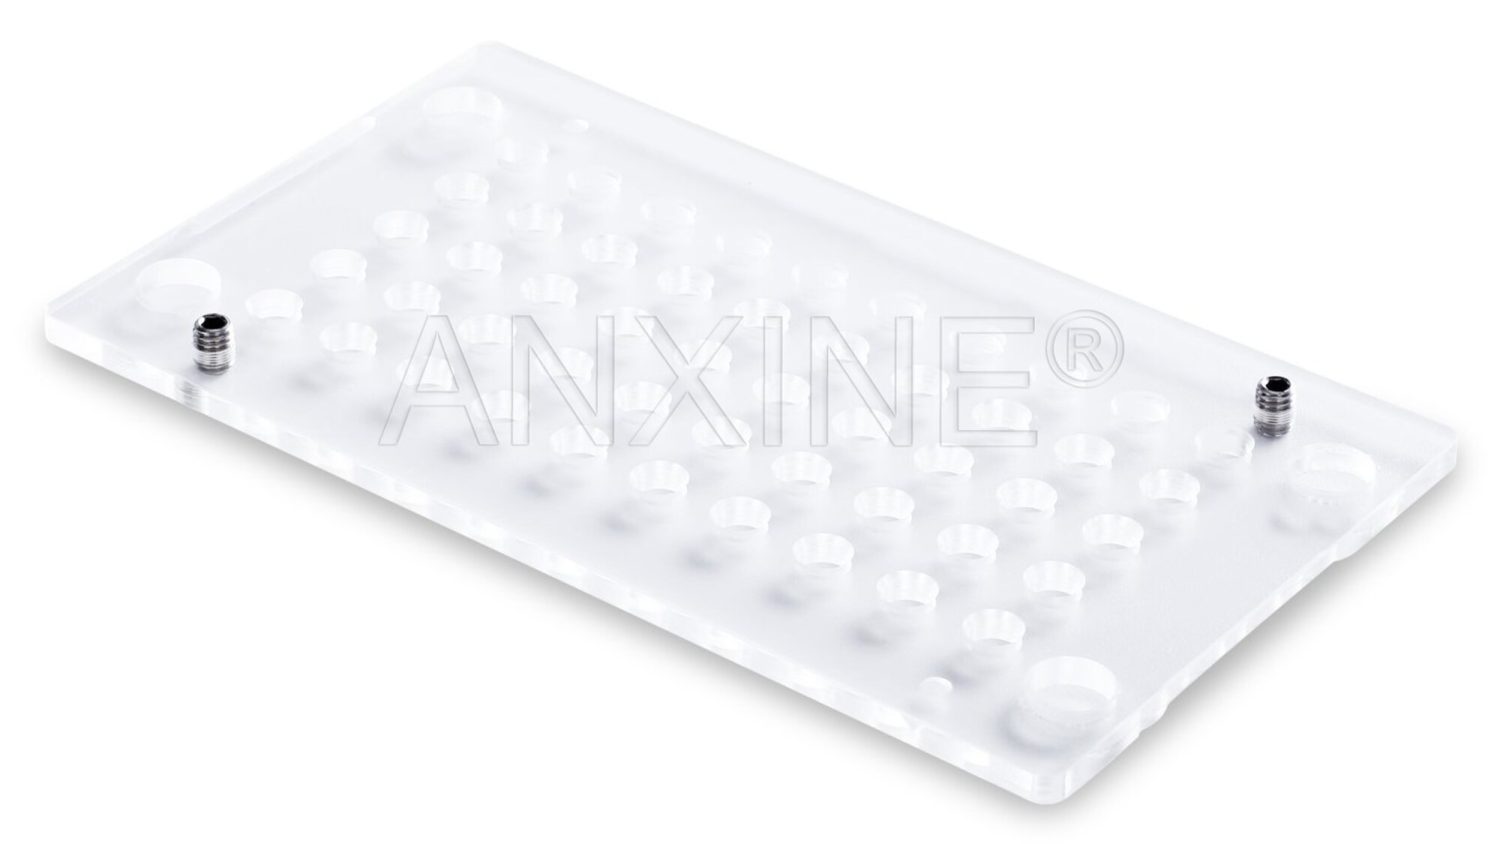
2. Body Plate
This plate offers seats for empty capsule bodies. In one manual capsule filler, the body plate has the same number of holes as the cap plate. But the hole sizes are smaller. You know why?

If you take a closer look at a regular capsule, you’ll find its cap is wider than the body. That means the hole sizes on both plates are not identical, or the caps and bodies wouldn’t line up correctly when you close the capsule.
3. Alignment Plate
Actually, caps and bodies don’t go straight onto their plates. You need to set an alignment plate before loading them. This plate, sometimes called a frame plate, has matching holes that guide each capsule half into position.

The alignment plate has a “wall” on its perimeter. So, it can prevent the caps and bodies from spilling over the sides when loading and shaking. This makes the process more efficient and less messy.
3. Spill Guard and Spreader
These two components are used during the filling step.

The spill guard is like a frame with raised edges. Set it on top of the body plate and pour your powder within the frame. The main function is to prevent spillage and catch excess powder for reuse.
The spreader, also called a scraper, is a simple tool that sweeps the powder across the body plate to fill the empty capsule bodies. The leveling action ensures each body is filled to the top.
4. Tamper
This part has pins that match the body plate holes. It often comes with a handle that makes it easier to press the powder down inside the capsule bodies. Using a tamper is to make room for more fill. It also helps prevent air pockets in the fill.
If the capsule bodies still look underfilled, use the tamper with the spreader. Add a little more powder, level it, and tamp again until you reach the right fill level.
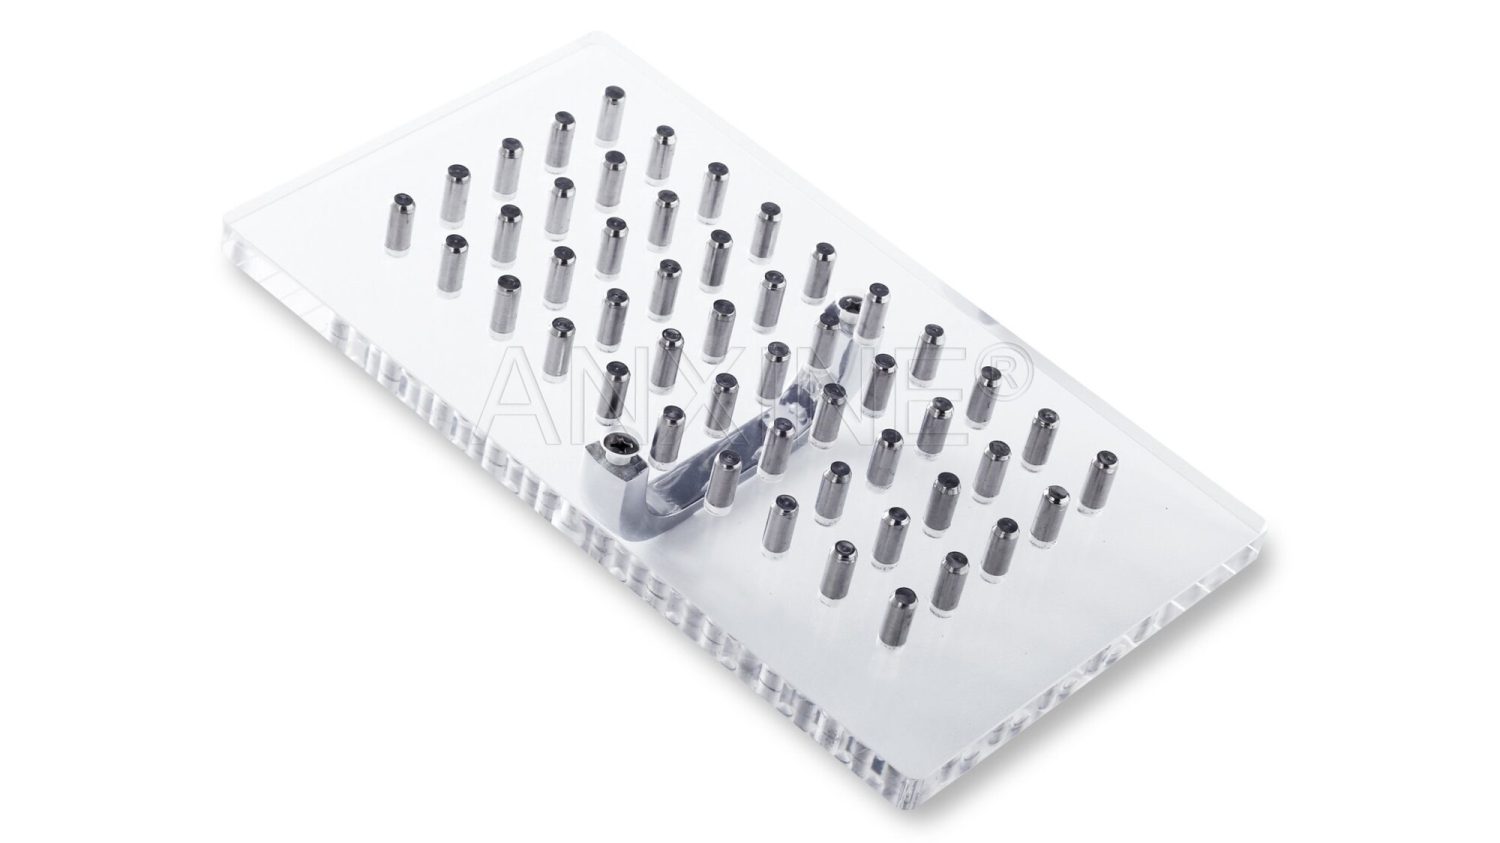
5. Middle Plate
This is the key part used to close the capsule halves. It is much thinner than the cap and body plates, but it has the same number of holes. The middle plate’s job is to help line up the caps and bodies so they can lock together.
You place this thin sheet on top of the cap plate, flip the stack over, and then connect it to the body plate. After that, you can flip the whole setup and press down on the cap or body plate to close the capsule halves.
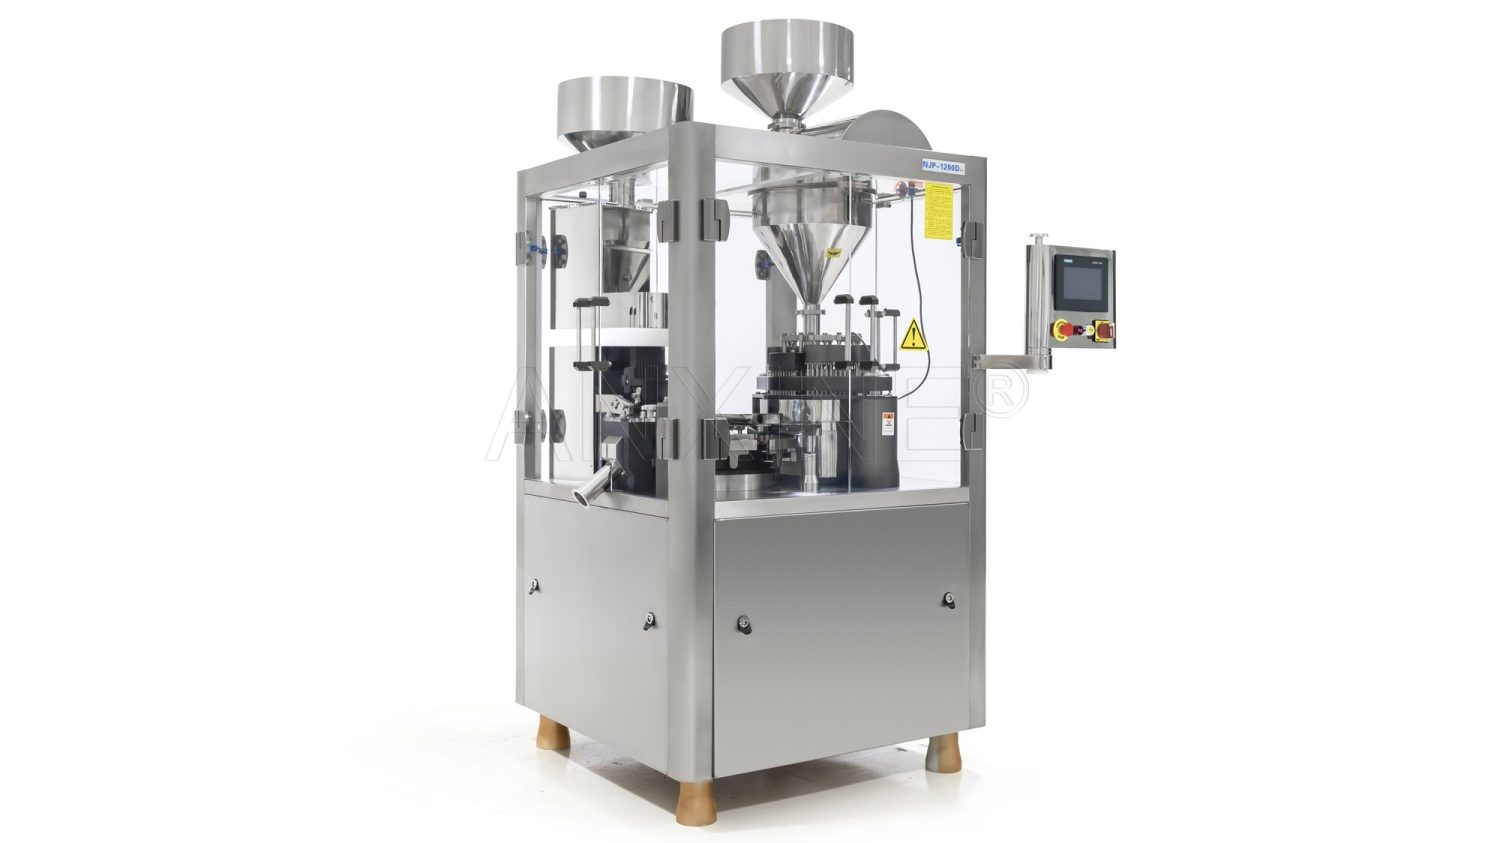
Semi-Automatic Capsule Filling Machine Parts and Their Functions
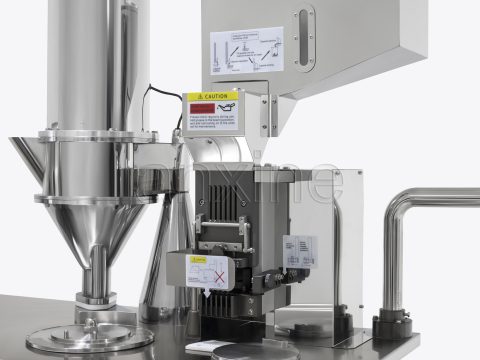
A semi-automatic capsule filler machine is not simply an upgrade of a manual one. It uses partial automation, so its structure and components are much more complex. And most parts are crafted from stainless steel for hygiene and durability.
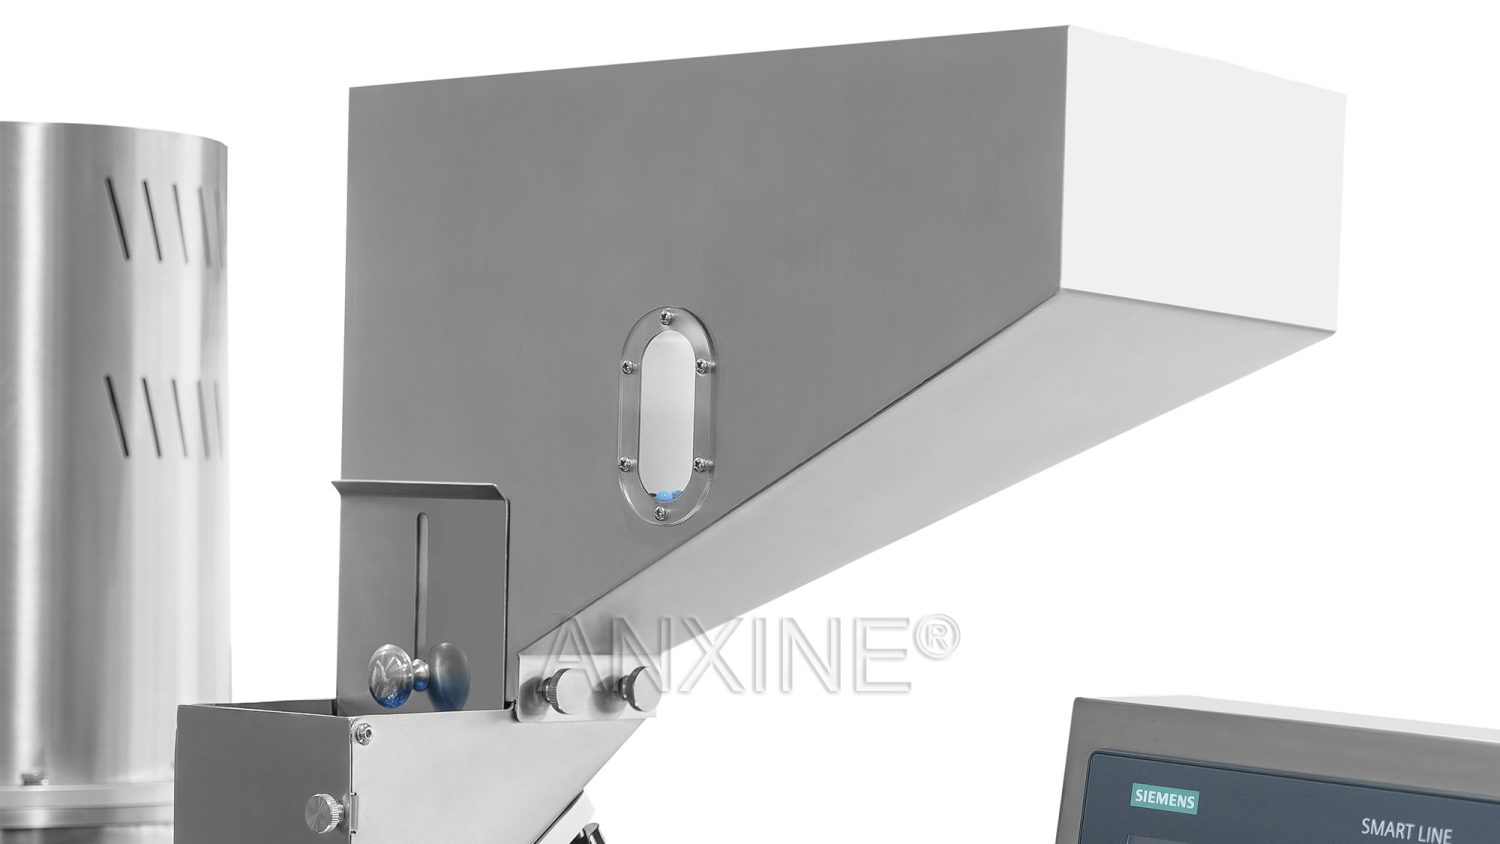
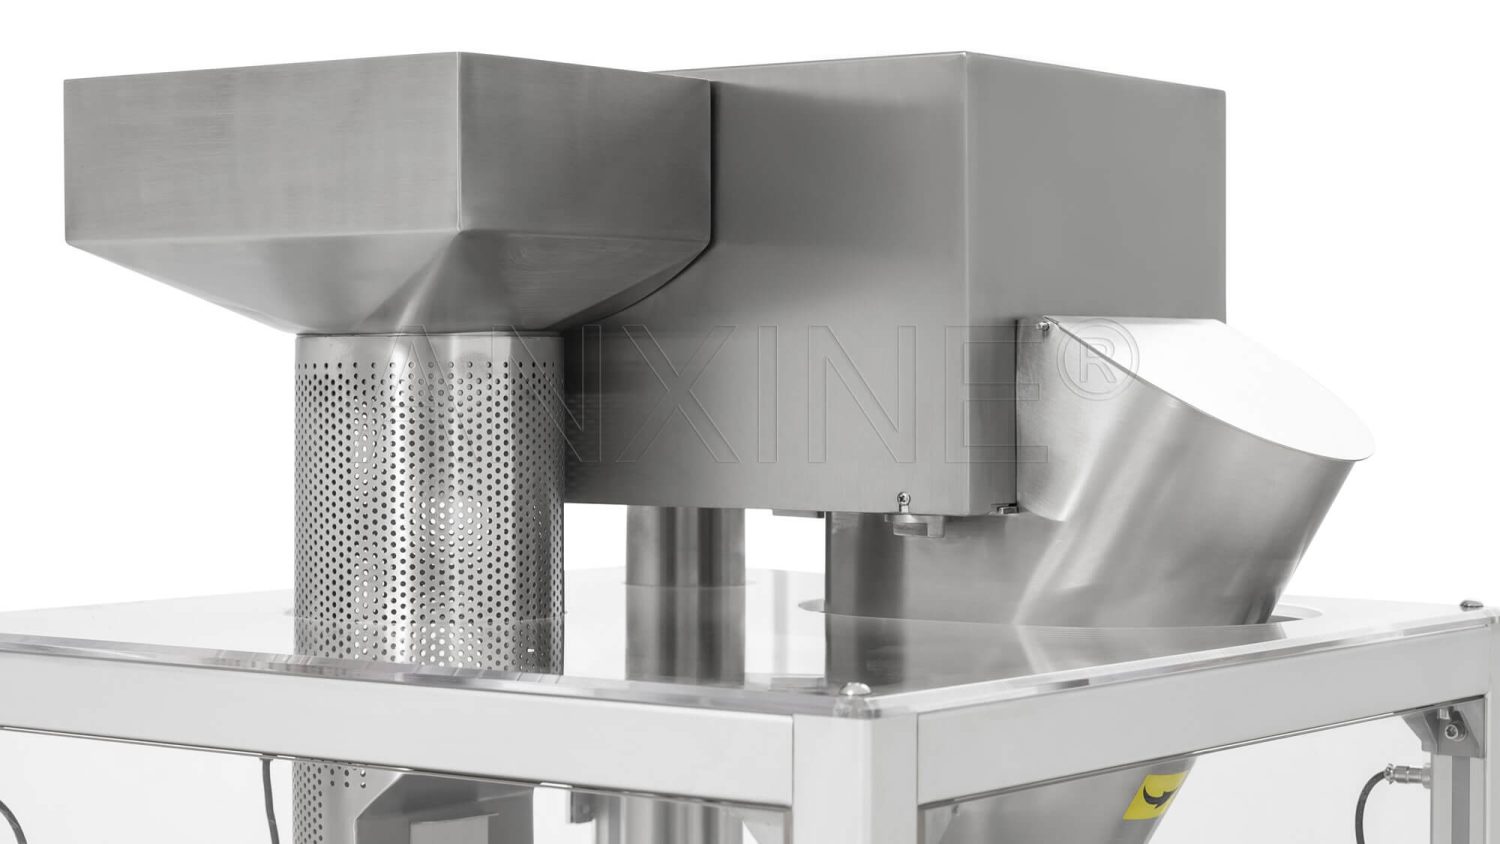
1. Powder Hopper
This component is a funnel-shaped container that stores the powder you’re filling. It may use vibration plus an auger to keep the powder flowing well into the dosing unit. In some advanced models, this hopper even features a level sensor to alert you when the powder is running low.
2. Capsule Hopper
A capsule hopper stores empty capsules and sends them into the orientation unit. It often features a small sight window so you can check how many capsules are left. Like the powder hopper, it also uses a level sensor to monitor if the capsules are low. If so, the machine stops or alarms.
This hopper also includes an adjustable feed gate to control capsule flow and prevent jams. A built-in vibration feature helps capsule feed smoothly.
3. Orientation and Feeding Mechanism
As capsules pass through the magazine, some of them may be upside down. The orientation unit steps in to correct that. It arranges each capsule with the body down and the cap on top so they are ready for separation and filling.
The setup uses a magazine, a sorting block, and horizontal fingers to guide each capsule and ensure the body reaches the filling ring first.
Once rectified, the empty capsules are fed into the filling ring by this assembly.
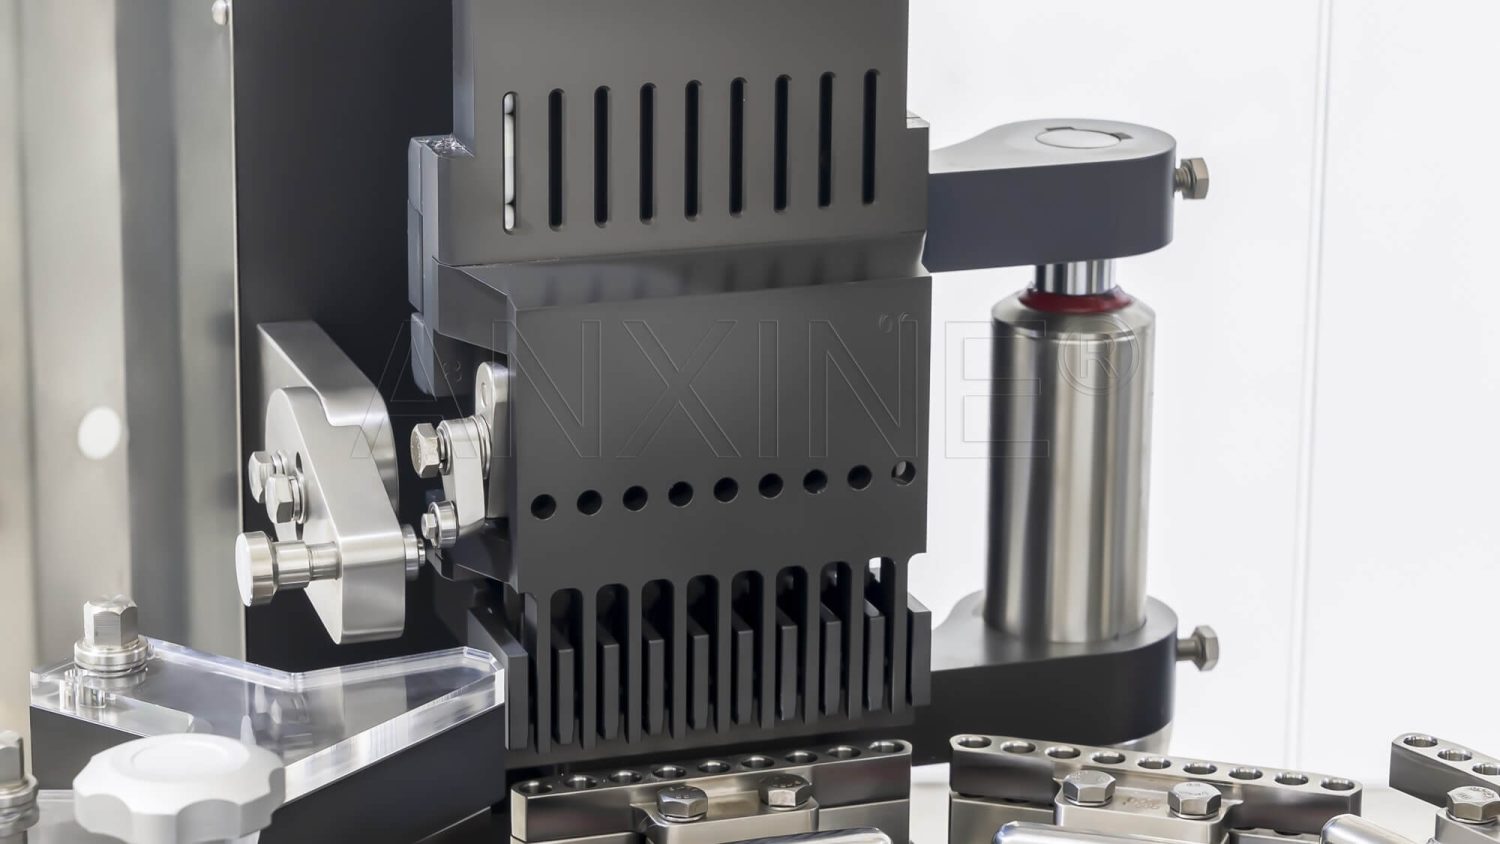
4. Filling Ring
This assembly is made of two discs that can be taken apart and rejoined. Both discs come with a matching number of holes for accommodating empty capsules. When you separate them, the upper disc captures the capsule caps, and the lower disc holds the bodies.
The filling ring rotates at a set pace under the orientation and feeding system to catch empty capsules row by row. When the ring is full, you can stop the motion and separate the ring with the help of the vacuum.
5. Filling Head
This component connects directly to the powder hopper. The powder is transferred to the head by auger feeding. When the fill ring is set in position, the filling head slides over it and dispenses powder into each capsule body as the ring rotates. It stops the fill once each body has been dosed.
6. Peg Ring
This is the core tooling of the capsule closing mechanism. It’s covered with pins that match the number of holes of the filling ring.
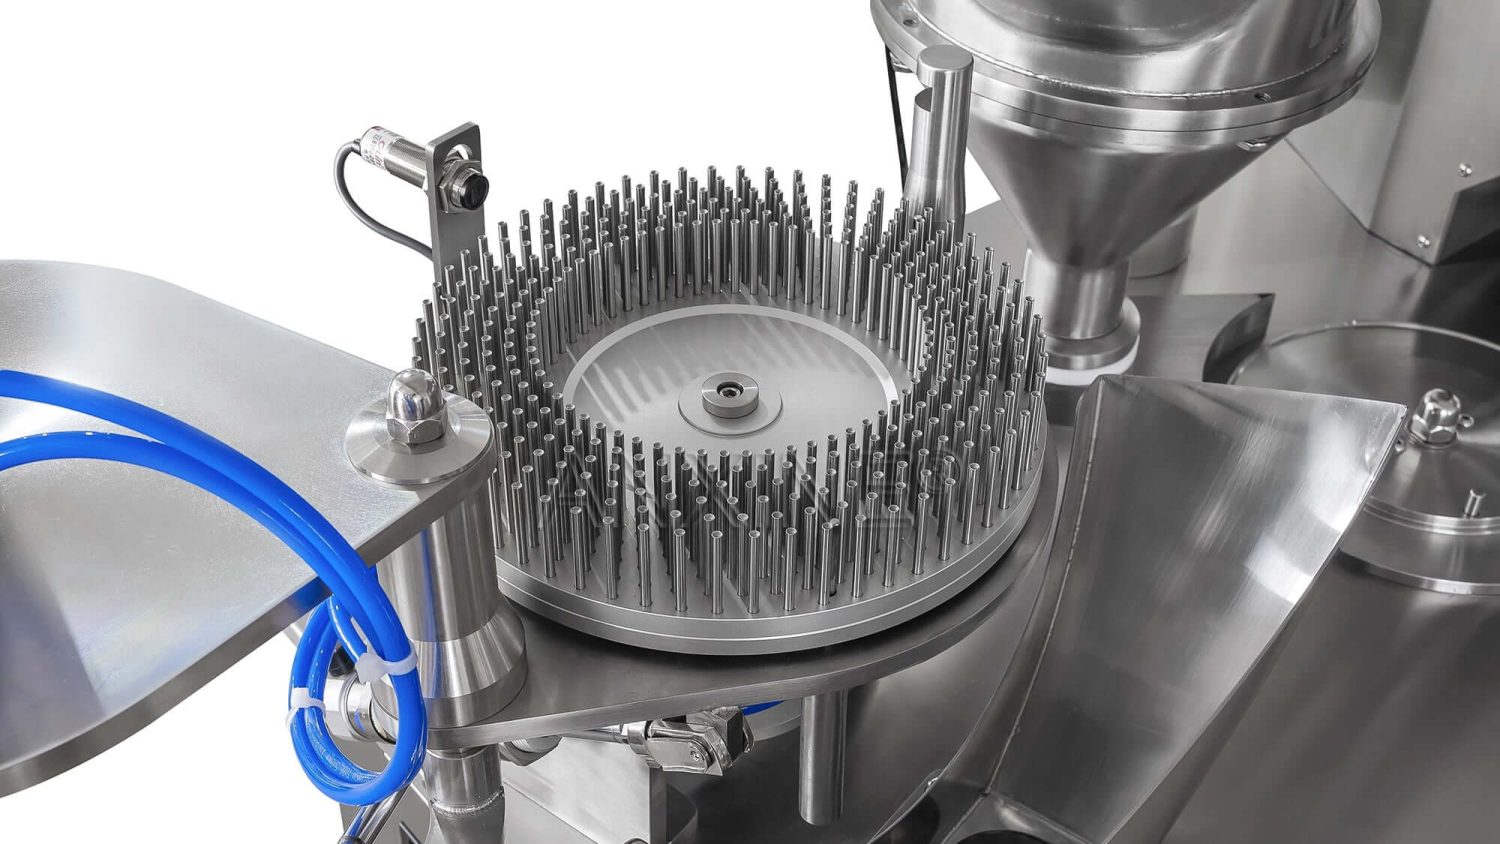
Once the filling is done, the discs for the capsule caps and bodies are reassembled. They are manually moved to the closing station and lined up with the peg ring. Make sure each pin points to each hole.
With the help of mechanical force, the pegs push the bodies to snap into the caps and lock the capsules.
7. Control Panel / Push Buttons / Foot Pedal
These components automate part of the capsule filling process.
The control panel may be a touchscreen or a set of physical buttons, depending on the model. For example, you can adjust the capsule feeding speed and start the filling cycle through it.
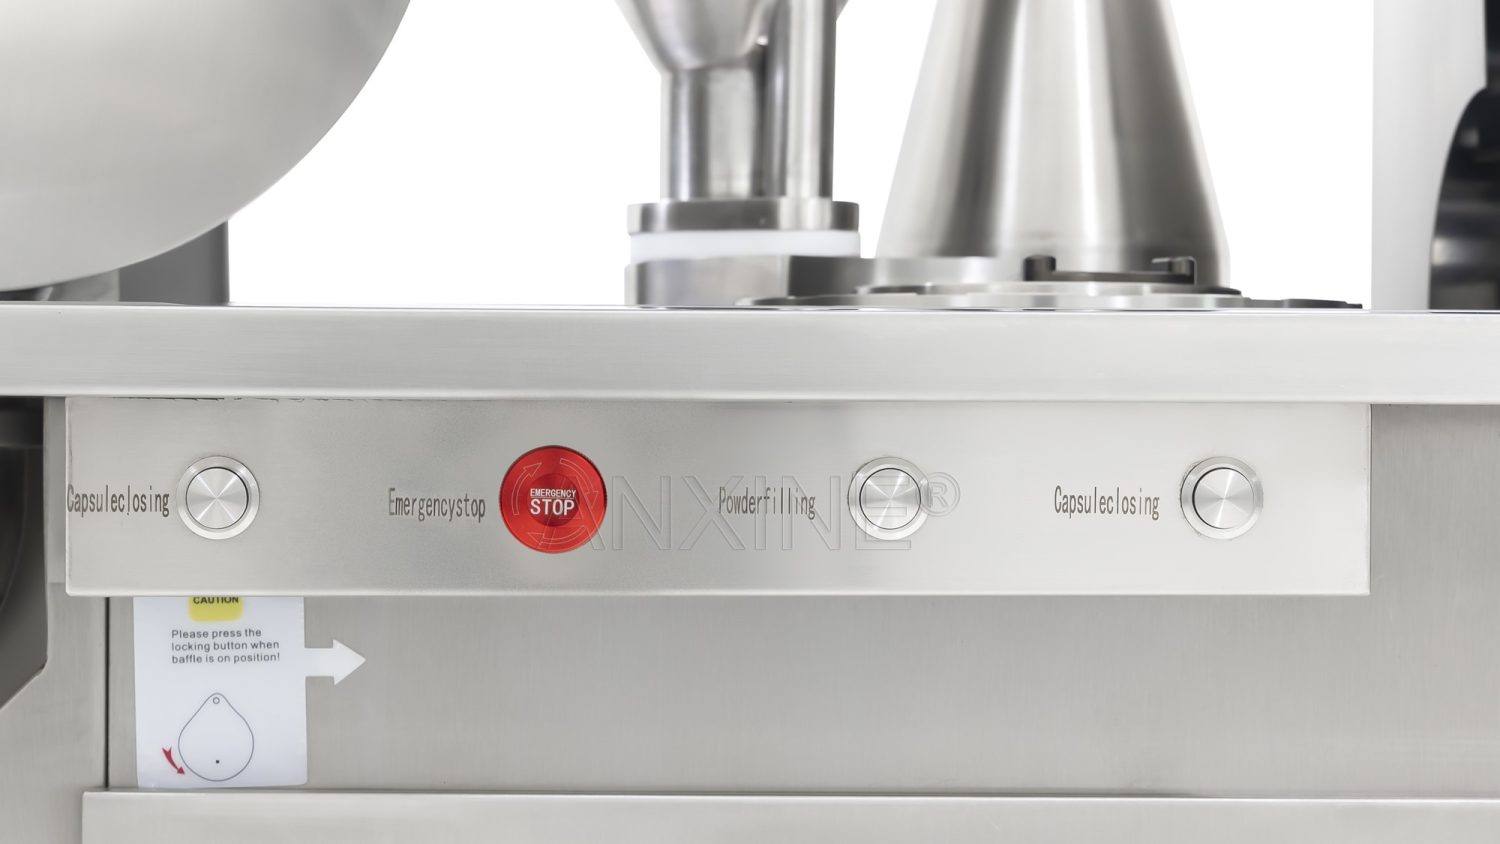
Many semi-automatic machines are fitted with push buttons or a foot pedal to release the closed capsules at the end of the cycle.
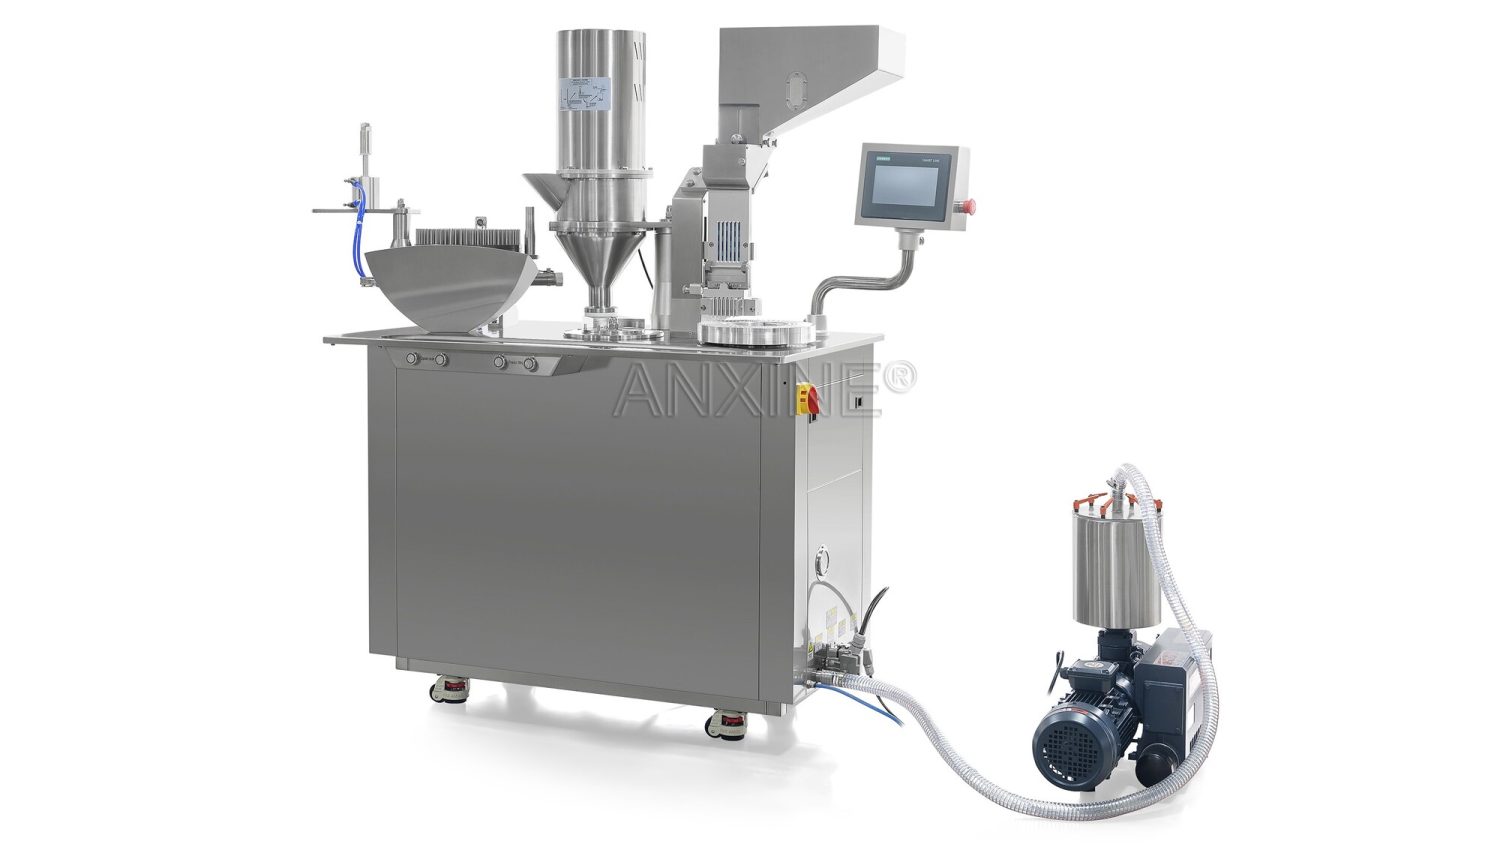
Fully Automatic Capsule Filling Machine Parts And Their Functions
An automatic capsule filling machine takes care of the entire process from capsule feeding to final ejection. Naturally, it has the most comprehensive and complex set of parts. Here are the core components and assemblies you’d typically find:
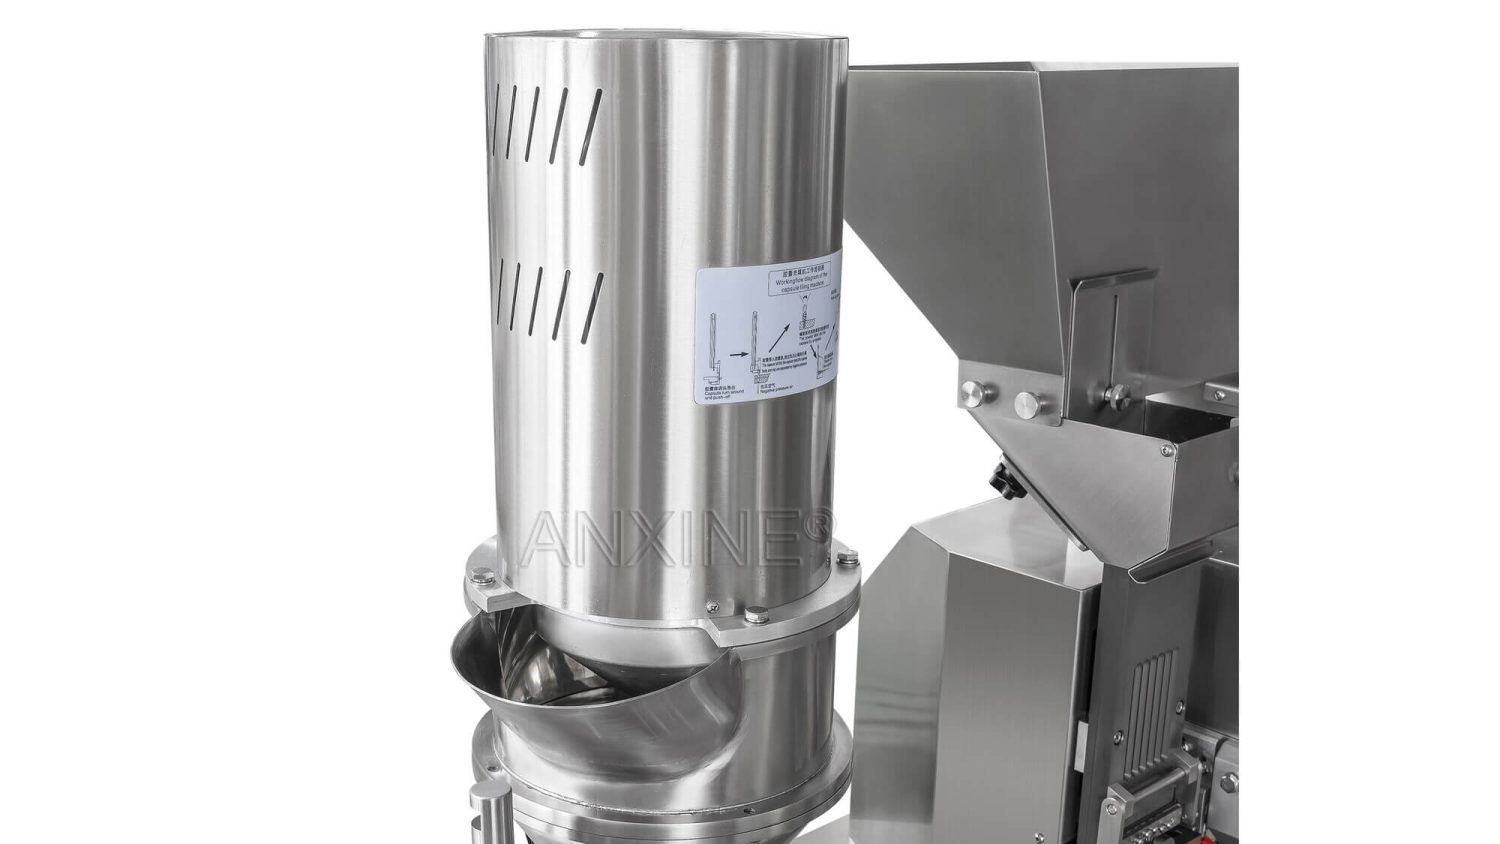
1. Empty Capsule and Powder Hoppers
These hoppers work much like the ones on semi-automatic capsule filling machines. They typically come bigger because automatic fillers handle higher volumes of empty capsules and powders.
In many automatic machines, the hoppers can be paired with material feeders, so capsules and powder can be loaded with minimal manual effort. They also feature sensors to monitor the capsule or powder level so you can top up when running low.
The capsule hopper has an adjustable gate to control the feed into the orientation unit. The powder hopper usually sends powder into the dosing system using gravity and an auger or agitator.
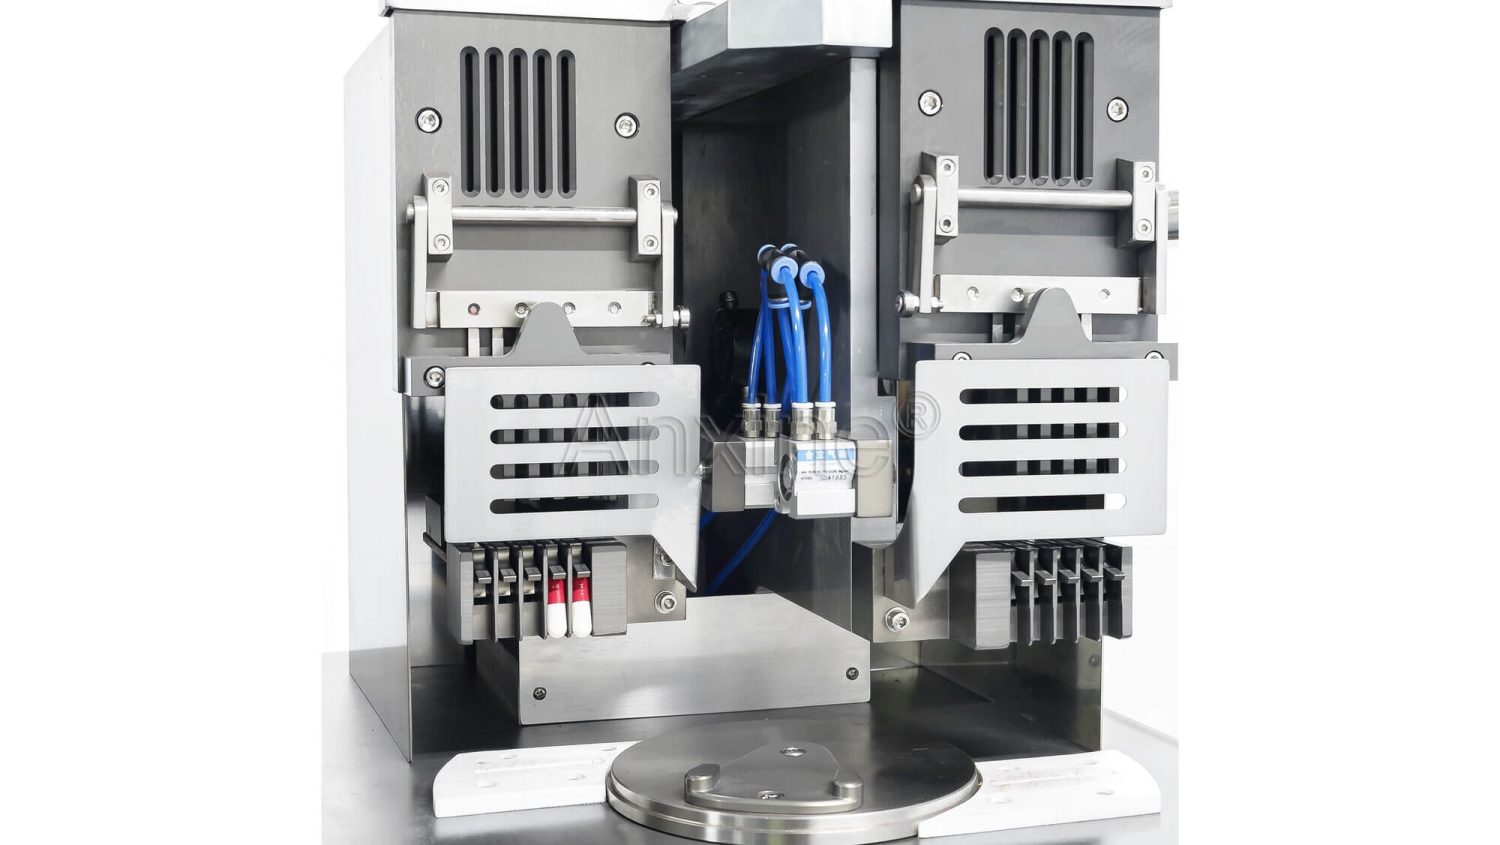
2. Capsule Orientation and Feeding Unit
This assembly functions almost the same as the one in a semi-automatic capsule filler. It collects the capsules randomly from the hopper, guides them through the magazine, and uses a sorting block and horizontal fingers to orient them in the same direction. After that, it loads the capsules into the segments for the next step.
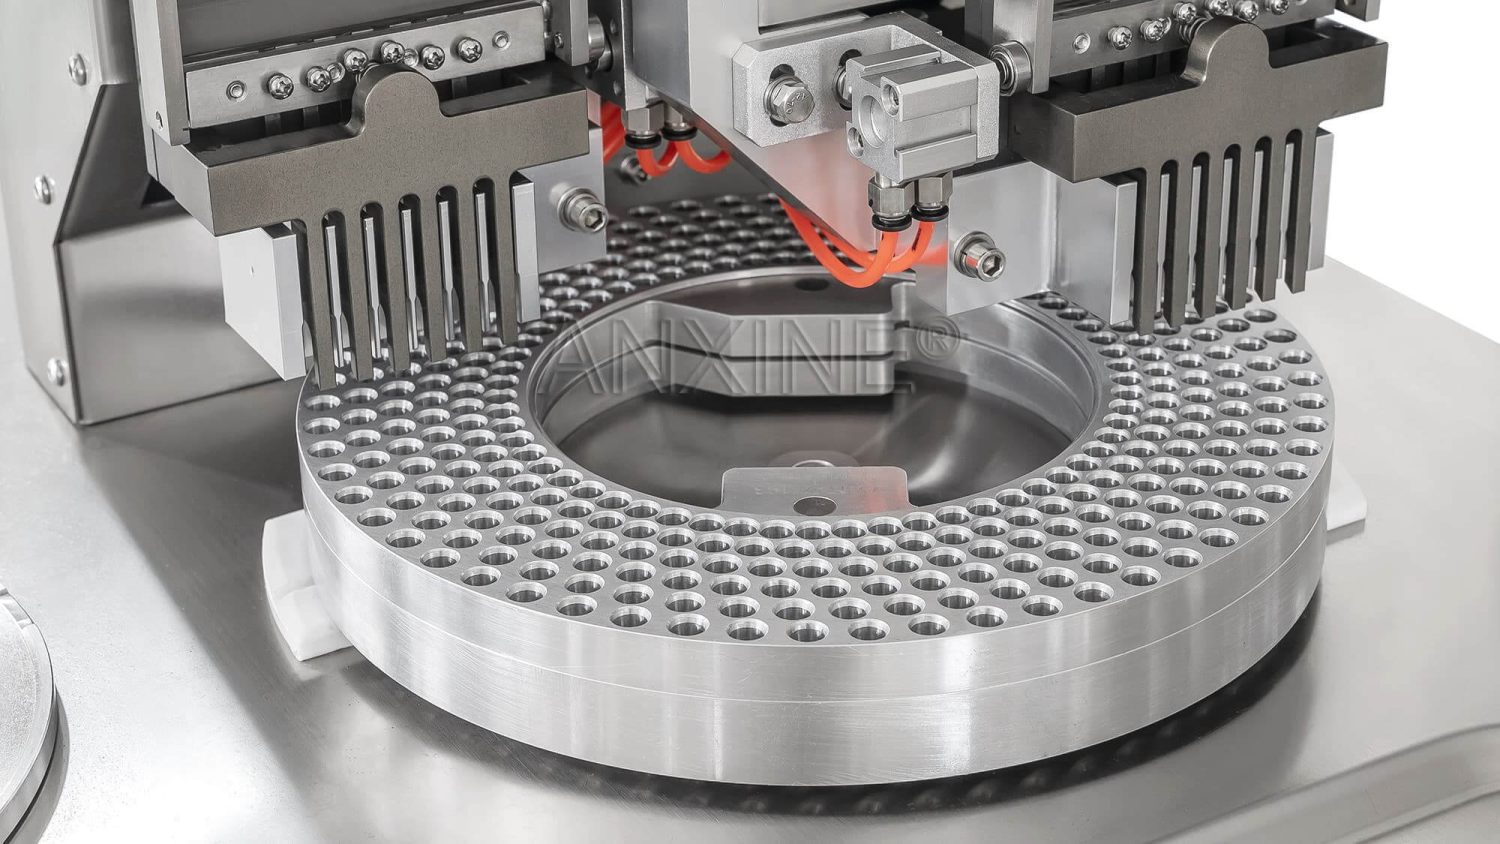
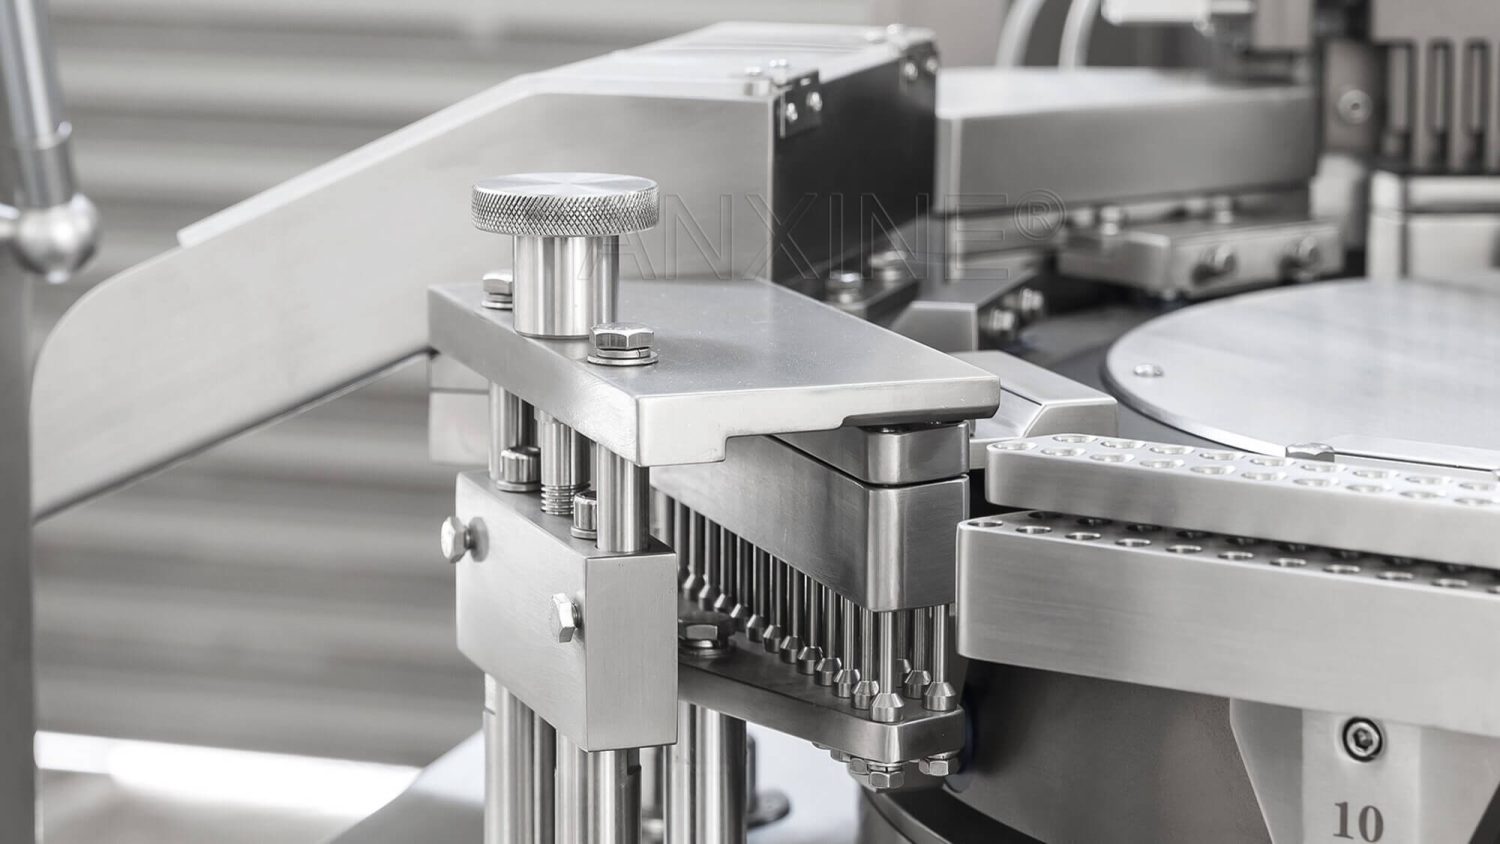
3. Rotary Turret with Segments
This setup is responsible for transferring capsules from one station to another. The turret has multiple pairs of segments mounted on its perimeter. Each set includes an upper segment for caps and a lower segment for bodies.
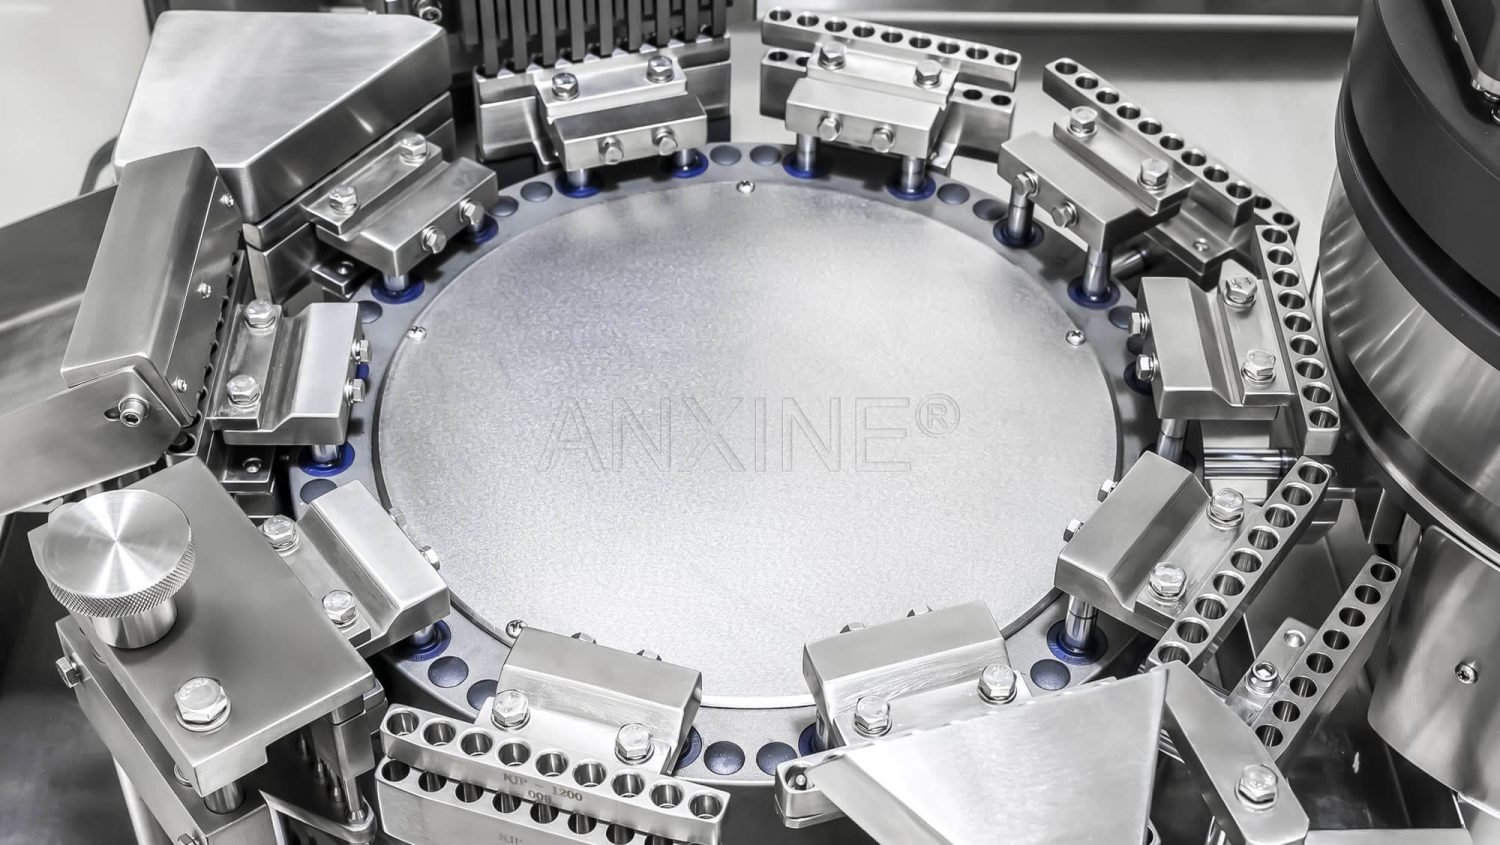
As the turret rotates, it moves these segments through each station. The segments open to separate the capsules for filling, then rejoin to lock them.
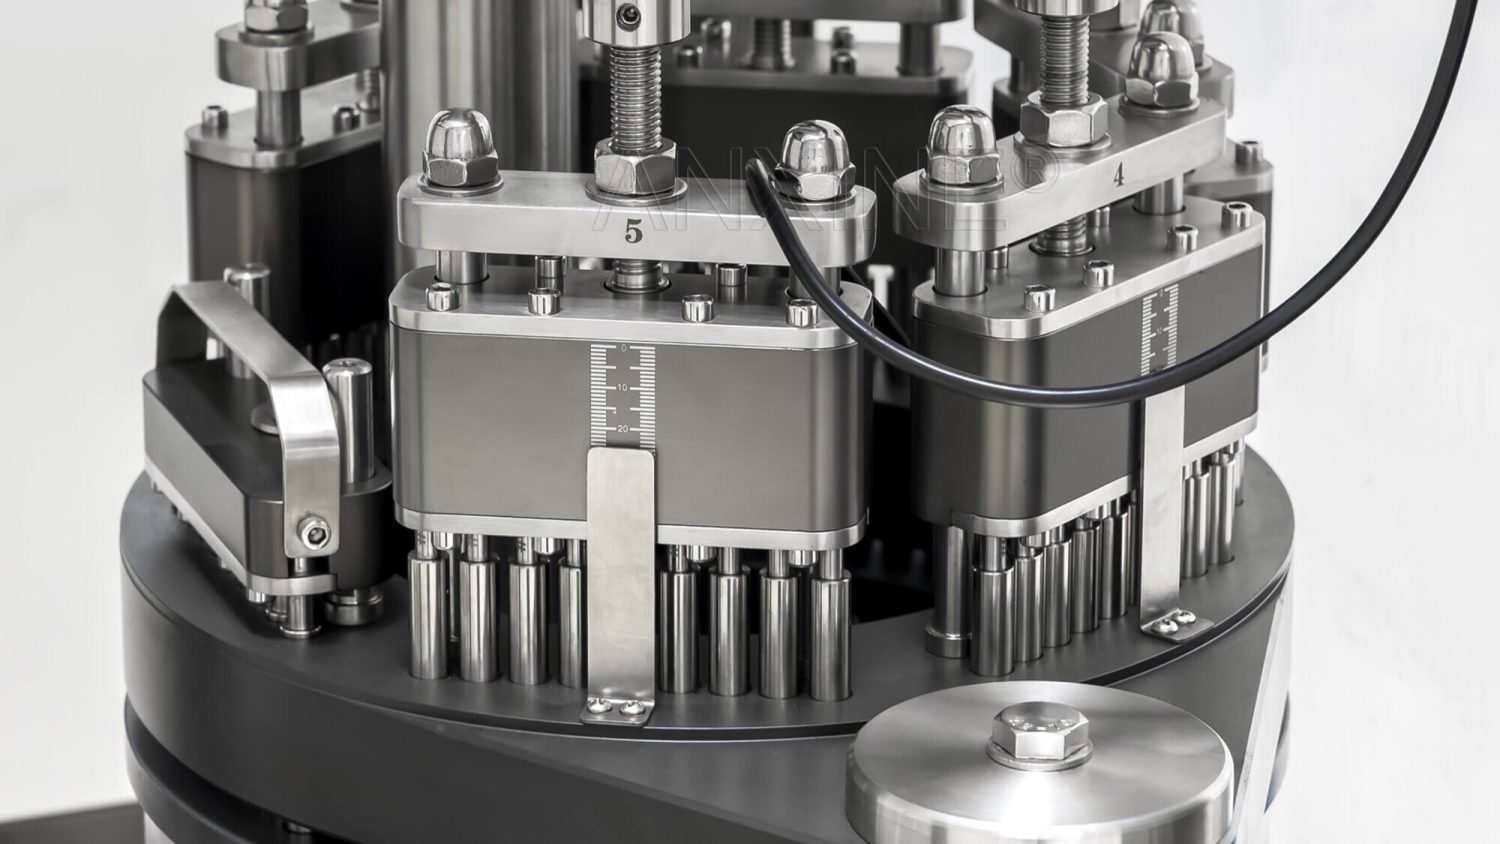
4. Dosing and Filling System
This is the heart of an automatic capsule filler. Modern machines usually use one of the two methods for capsule filling: dosator or tamping pin.
Dosator system: It lowers a tube into a powder bed to pick up the exact amount of powder. The piston within the tube lightly compresses the powder into a slug. And then the dosator retracts from the powder bed and drops the compacted powder slug into the capsule body.

Tamping pin system: It includes a dosing disc with holes and a series of tamping pins. As the disc rotates, the pins compress the powder into a slug. The difference is that the tamping method takes multiple compression steps to form a powder plug. Once the final compression is complete, an ejection pin pushes the slug out of the dosing disc hole and directly into the empty capsule body.
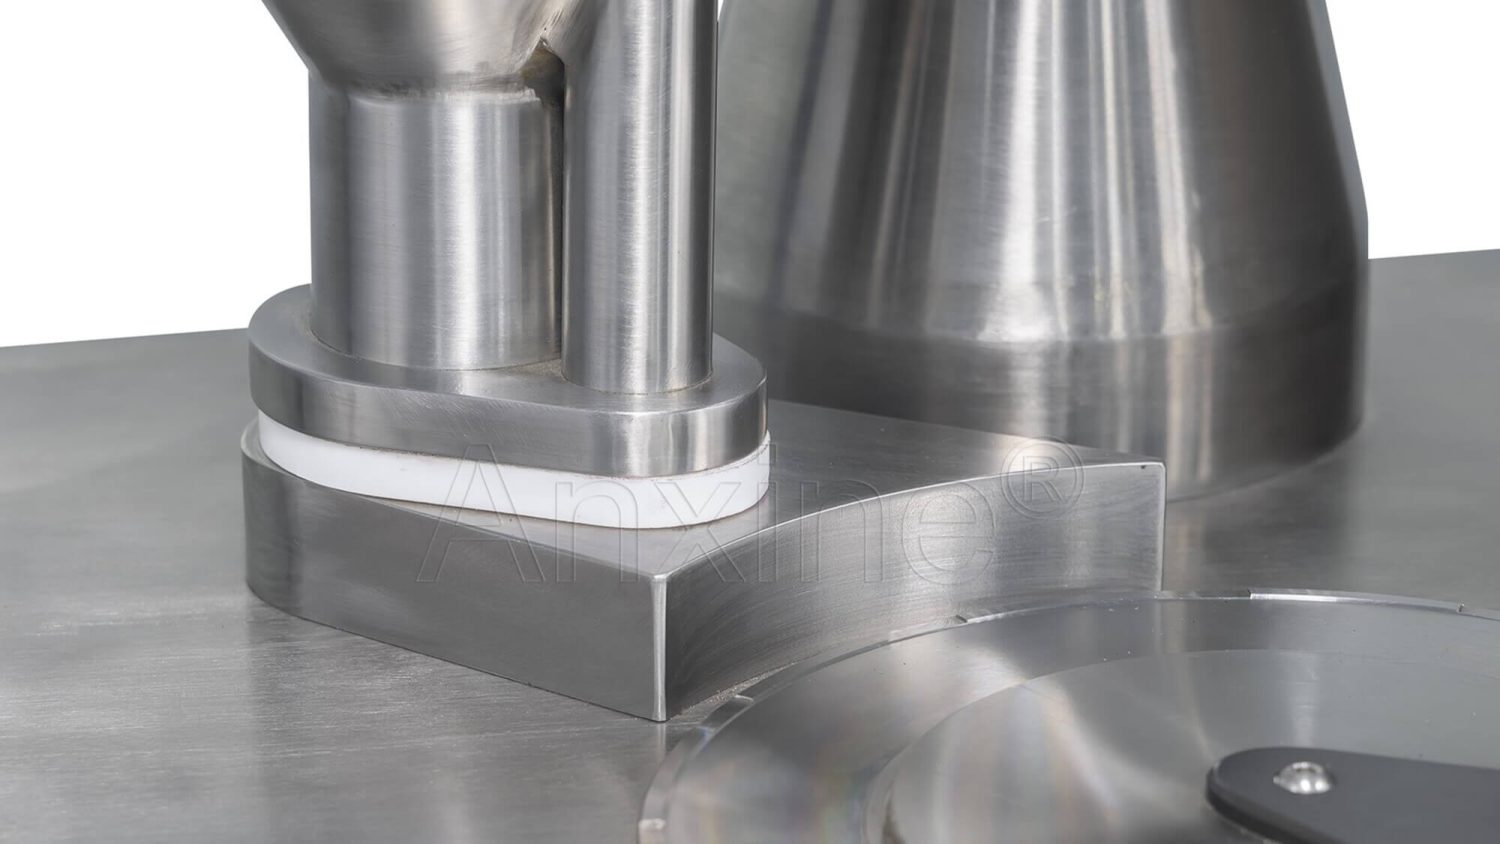
5. Rejection Unit
In this stage, sensors, pins, and compressed air work together to remove any defective capsules.
As the turret brings the segments to the rejection station, the sensors check whether a capsule is unseparated, missing, damaged, or unfilled.

When an issue is detected, the ejection pins push the target out of the segment. A blast of compressed air blows it down the reject chute into the waste bin.
6. Closing Mechanism
This part brings the capsule halves back together using an alignment plate, closing pins, and mechanical force.
As the upper and lower segments arrive at the closing station, the machine applies a controlled force to press them together.
The closing pins are positioned under the lower segment. They push the filled capsule bodies upward so they slide into the caps.
At the same time, the fixed alignment plate above the caps provides a steady counter-force to help the rising bodies snap perfectly into place.
7. Ejector System
Now it’s time for the filled and closed capsules to leave the machine.
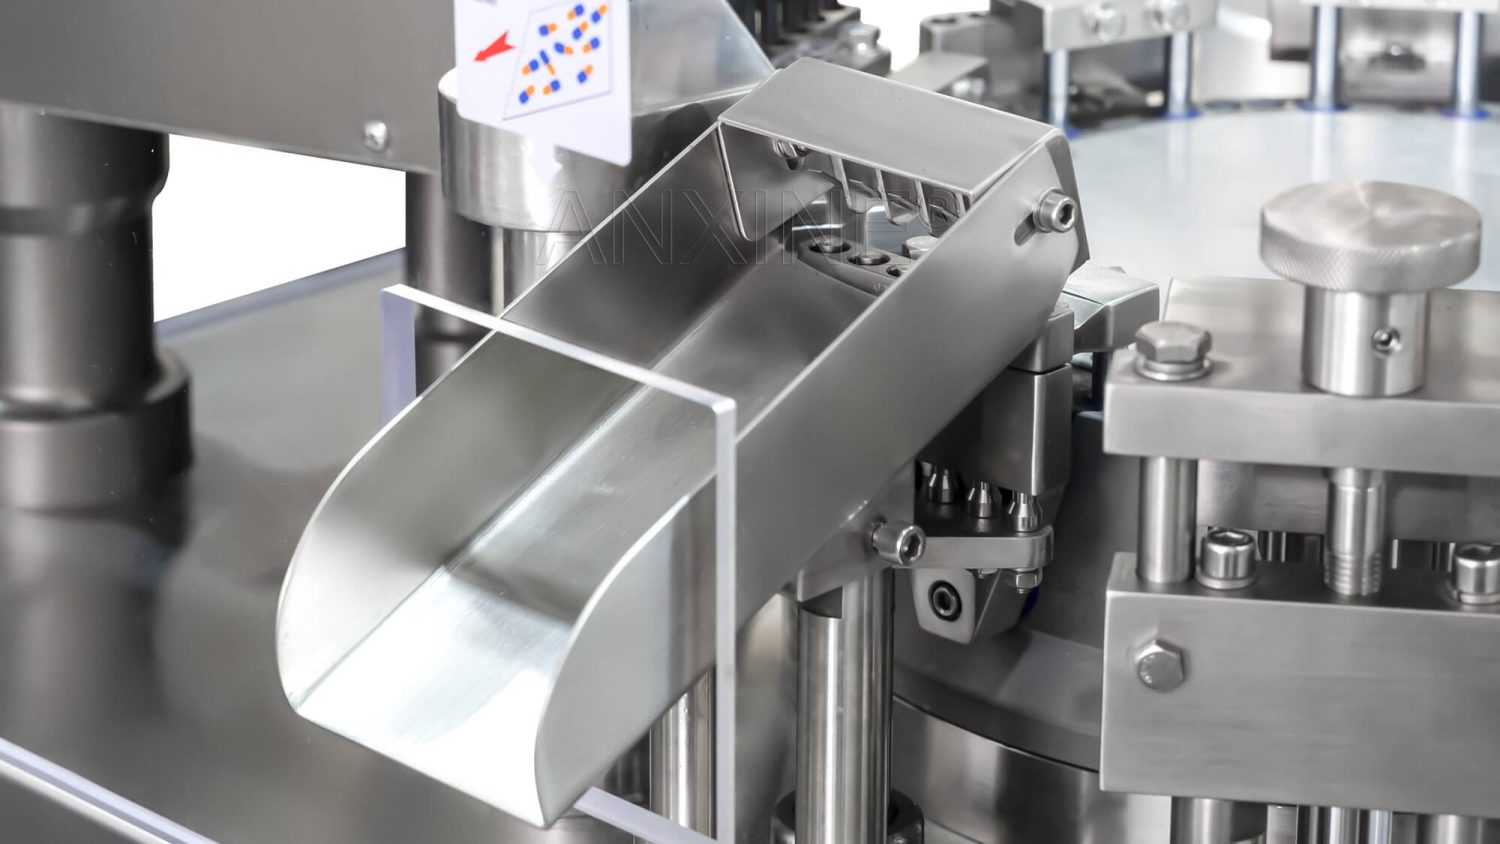
This assembly uses pins to eject all capsules from the capsule segment bores. In some machine models, a gentle air blast is applied to assist in clearing the capsules and directing them into the discharge chute.
8. PLC & HMI
Fully automatic capsule filling machines are controlled by a PLC system. The PLC manages all the machine functions like sensors, vacuum levels, dosing, and the mechanical movements.
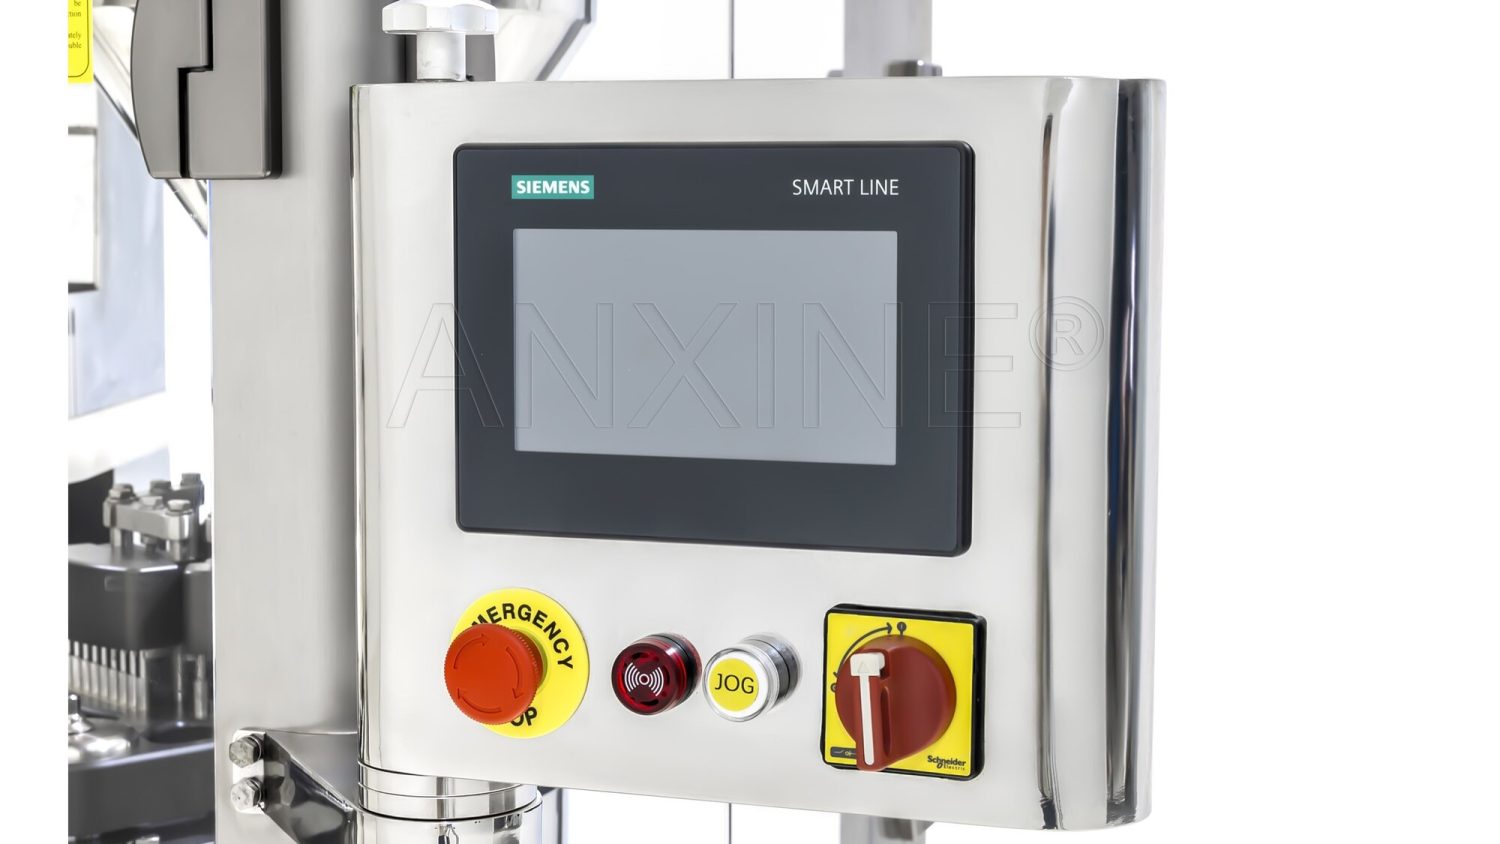
You can operate and monitor everything through an HMI touchscreen. Modern HMIs are easy to use and can store recipes for different products. You can set capsule size, filling weight, production speed, and more. The screen also displays alarms and diagnostic messages to help you troubleshoot quickly.
Final Word
Thanks for making it to the end. We hope this guide made your capsule filling machine parts easier to understand. As a trusted capsule filling machine manufacturer, Anxine is here for you. If you need help choosing or using capsule fillers, feel free to reach out anytime.