
In my earlier post, Industrial Ribbon Blender 101, we talked about what a ribbon blender is and when it makes sense. This time, let’s get into the part most of you care about: how the ribbon blender works.
Powder that looks perfectly mixed on top but segregates at the discharge port. Actives that seem missing in one batch and spike in the next. Or lumps that refuse to break no matter how long you run the ribbon blender.
I bet you’ve probably run into at least one of these issues when mixing your product. If you want to fix them efficiently, you might as well revisit the basics of the ribbon blender.
How Does a Ribbon Blender Work?
No beating around the bush. A ribbon blender doesn’t mix by random tumbling. It uses an agitator to create a controlled circulation loop where the material moves and mixes. Here’s how it works, step by step.
1. Material is loaded.
Materials are usually loaded into the blender trough from the top opening. Make sure the fill level is between 40% and 70% of the usable volume.
If you’re mixing a recipe, major ingredients go in first, then the minors like a drug active or a vitamin on top. Small components can also be layered between the base powder to spread more evenly.
For liquid addition, the blender is usually paired with a liquid feed system. The liquid is introduced through a spray bar or injection point on the lid.
Once everything is loaded, lock in the safety grates (if your blender has them) and close the trough lid.
2. Agitation starts.
The blender’s motor is then started. The central shaft begins to rotate, and the ribbons sweep through the product at a relatively low speed. It often runs at 15-50 RPM for most powders.
If you’re mixing a very heavy or dense powder, we recommend starting the agitator as you load the ingredients. That way, the blender doesn’t have to start from zero with a full load. This can strain the motor. But for most cases, you load then start.
3. Ribbons move to create convective mixing.
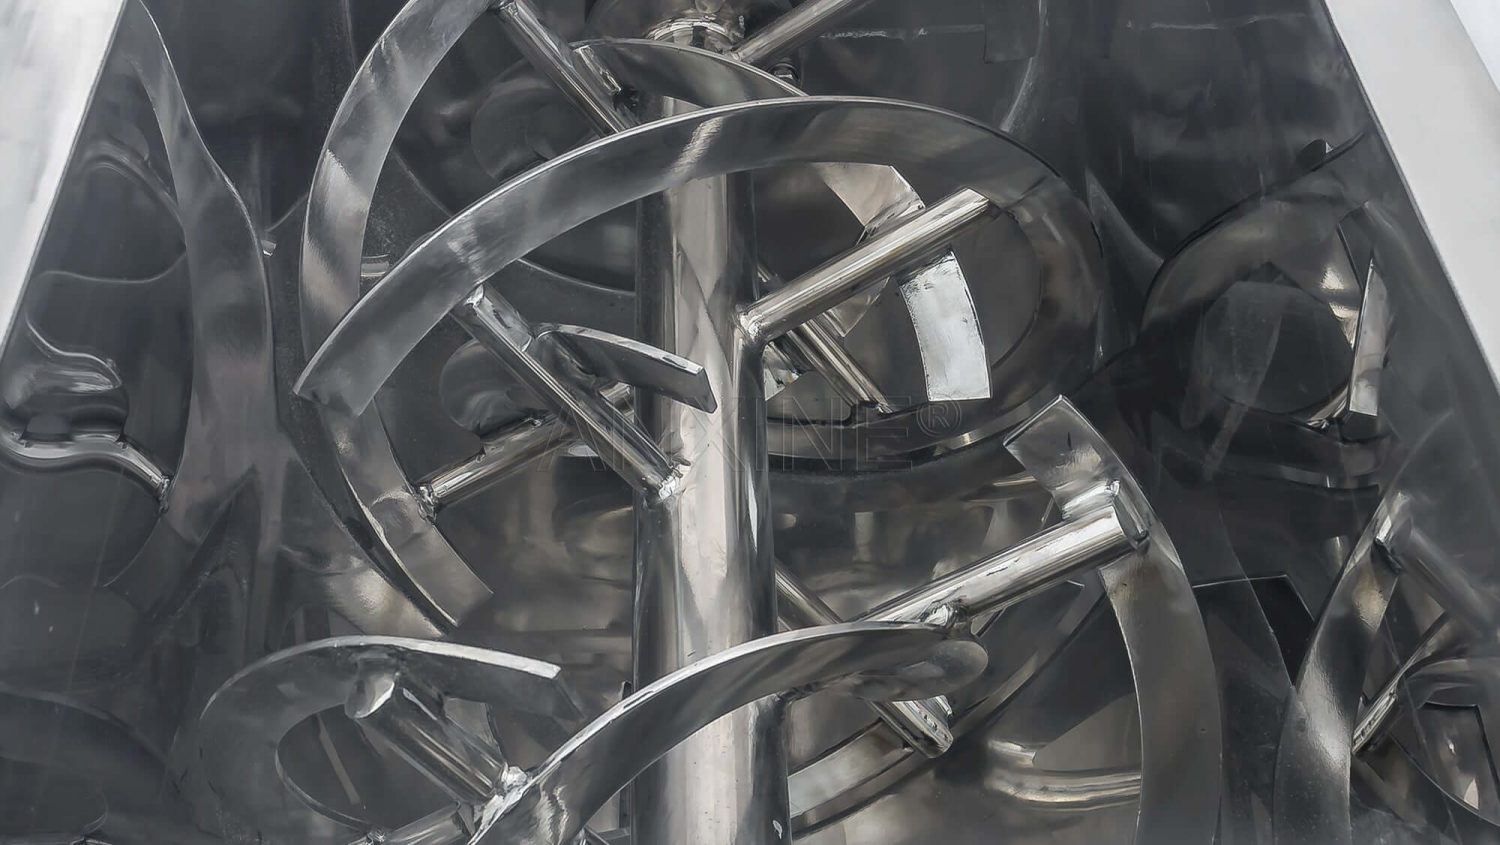
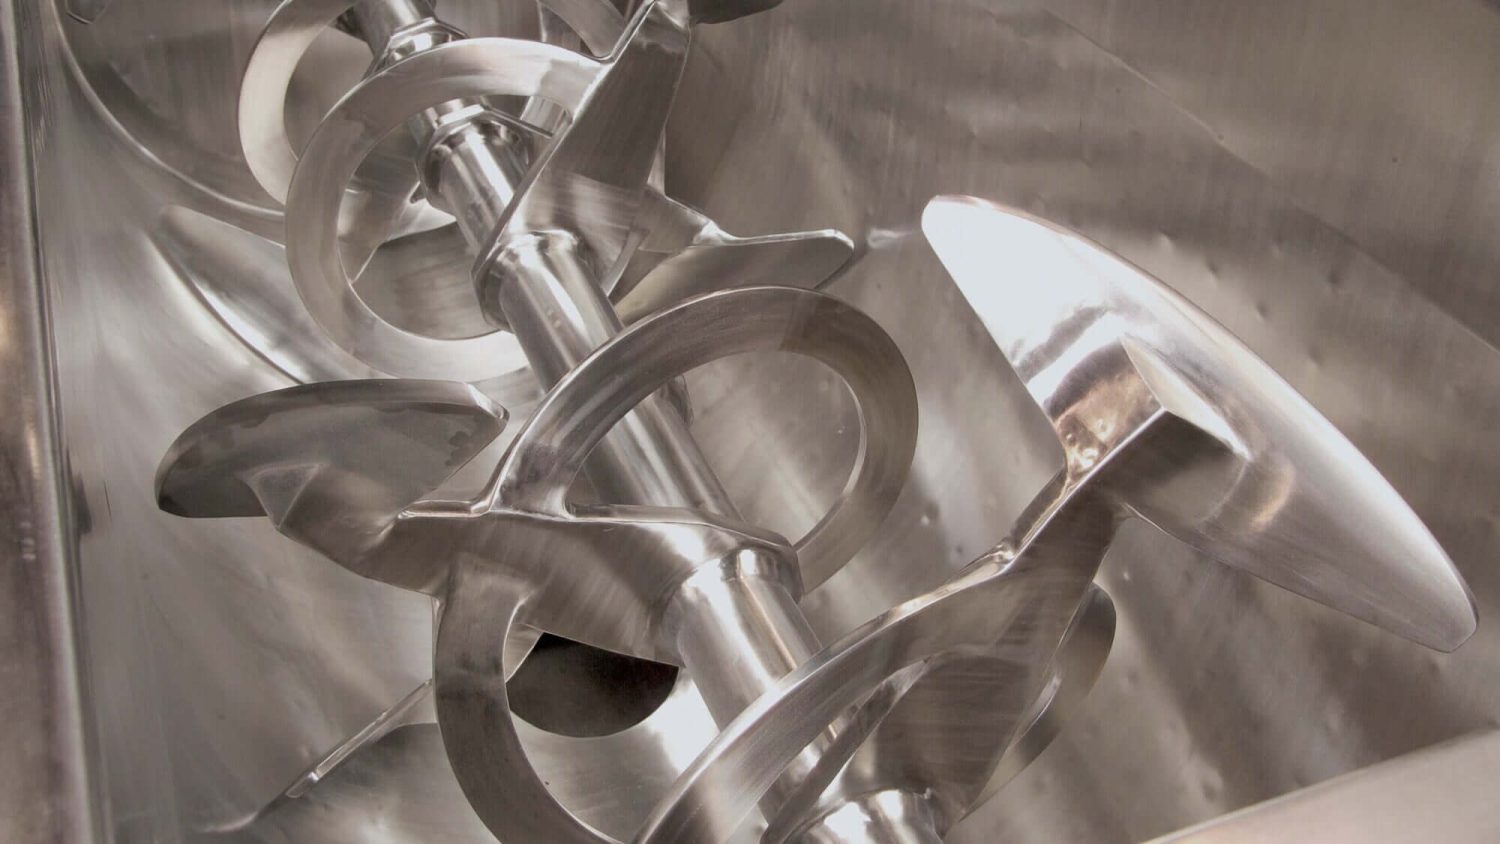
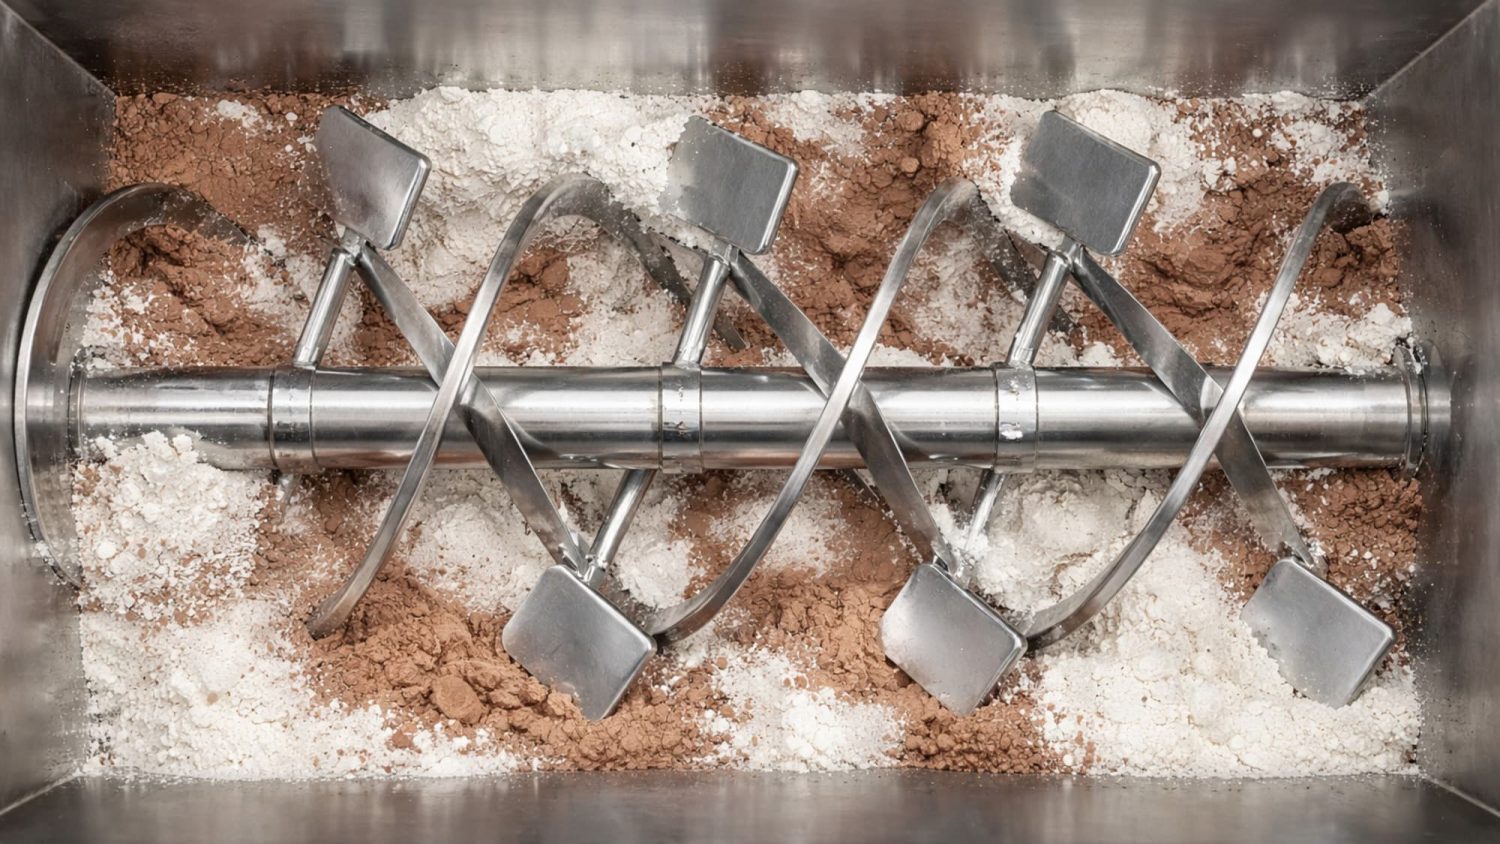
The rotating central shaft forces the ribbons to spin. In a standard ribbon blender, the outer ribbon pushes material from the ends of the trough toward the center. The inner ribbon carries material from the center out toward the ends. This counter-flow motion creates a circulation loop of material.
At the same time, because the ribbons are sweeping along the trough and have a helical shape, they are also lifting material up and folding it over. Particles are repeatedly intermixed in the circulation loop. This is convective mixing.
4. Lump breaks.
Convective mixing in a ribbon blender is usually gentle and low-shear. The shear can break down small clumps or agglomerates without damaging the particles too much.
If you’re dealing with moderate clumps, you can add chopper blades to the trough. The choppers help cut through lumps for better mixing. And you can run them only when needed.
5. Mixing continues.
In general, a mixing cycle in a standard ribbon blender is about 5 to 15 minutes. But it also depends on the material you’re dealing with.
If your powders flow well and have similar size and density, a well-designed ribbon blender will give you a uniform blend in as little as 3-5 minutes. Some users don’t trust that it’s fully mixed, so let it run longer. But extra time doesn’t help with the mix. In some cases, it can even degrade the material.
6. Discharge the mix.
Once blending is complete, the discharge valve at the bottom of the trough is opened. If it’s a horizontal blender, it’s best not stop the ribbons right away. Keeping them rotating at a low speed can help push product out through the outlet.
Many ribbon blenders can empty in a minute or two. Still, you typically won’t get a true 100% discharge. A thin layer might remain on the trough and ribbon surfaces, often around 1-2% of the batch. You can clear it with compressed air or steam. But never put your hands or any tools into the discharge opening.
Ribbon Blender Diagram: Anatomy and Function
If the step-by-step explanation is not intuitive, visualizing the machine may help you better understand the ribbon blender working principle. Here’s a typical anatomy of a ribbon blender. Let’s look at what each part does in mixing.
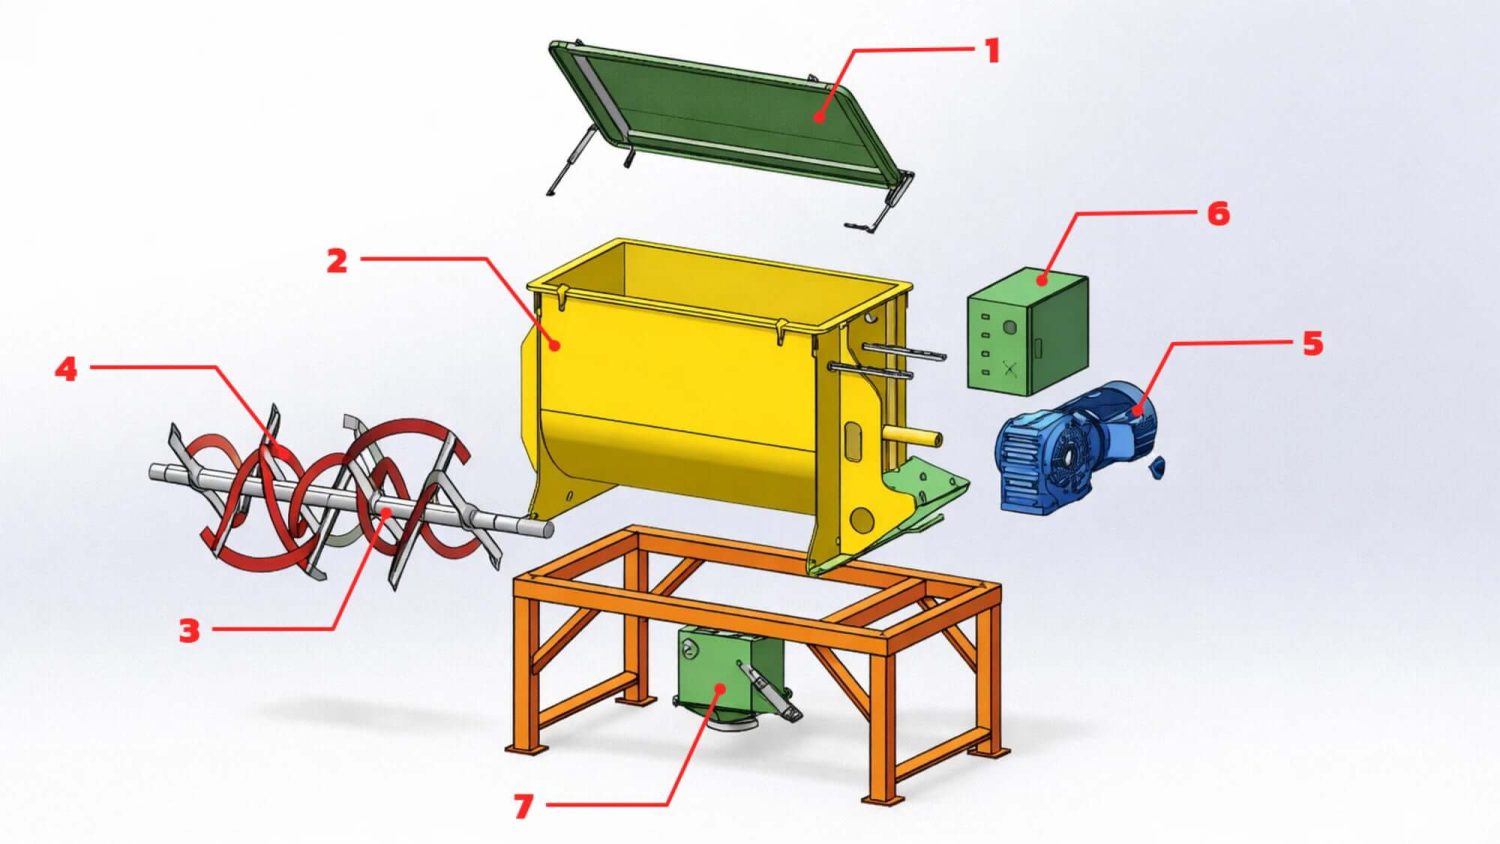
1. Cover: This can be a simple lid that seals the top opening for loading materials. Some designs add safety grates to protect the operator. For specialized blending, the cover might include only a small feed hatch, or it may be fitted with a port for an automatic feed hopper.
2. U-shaped Trough: This is a stainless-steel vessel with a curved base. It’s where the mixing occurs. The cover closes the trough to keep material contained during operation. The interior is usually smooth and polished to help prevent material buildup.
3. Central Shaft: It penetrates the trough end-walls and is driven by a motor to rotate.
4. Ribbons: This assembly usually includes an inner and outer helix. They’re fixed to the central shaft and spin together as the ribbon agitator. The inner and outer ribbons move in opposite directions to evenly blend the materials.
5. Drive System: You’ll typically find the system on the end of the trough. It houses an electric motor and a gearbox to spin the ribbon agitator.
6. Control Panel: This is where you start and stop the powder blender, set the mixing speed and time, control the discharge valve, and manage other blending parameters.
7. Discharge Valve: This component sits at the bottom of the trough. Once mixing is done, the valve opens to release the finished blend. Common designs include butterfly valves, slide gates, and drop-bottom doors.
Common Types of Ribbon Blenders and Mixers
Ribbon blenders actually come in various designs. They can match different materials and processes. The agitator design, vessel shape, and operating mode all change how the ribbon blender works. Since I don’t know what kind you’re using, learning the main ribbon mixer types is the best place to start.
Ribbon Blender Types by Agitator Style
1. Single / Double Ribbon Blender
As the name suggests, a single-ribbon blender uses just one helical ribbon, so it creates mostly one-directional material flow. Today, the single ribbon blender is not widely preferred in industrial plants because it is usually slower and less efficient.
I’m guessing you’re using a double ribbon blender. This is the classic, standard design. It has inner and outer helical ribbons mounted on the same shaft. Double ribbons move material back and forth in the trough to give a more uniform blend.
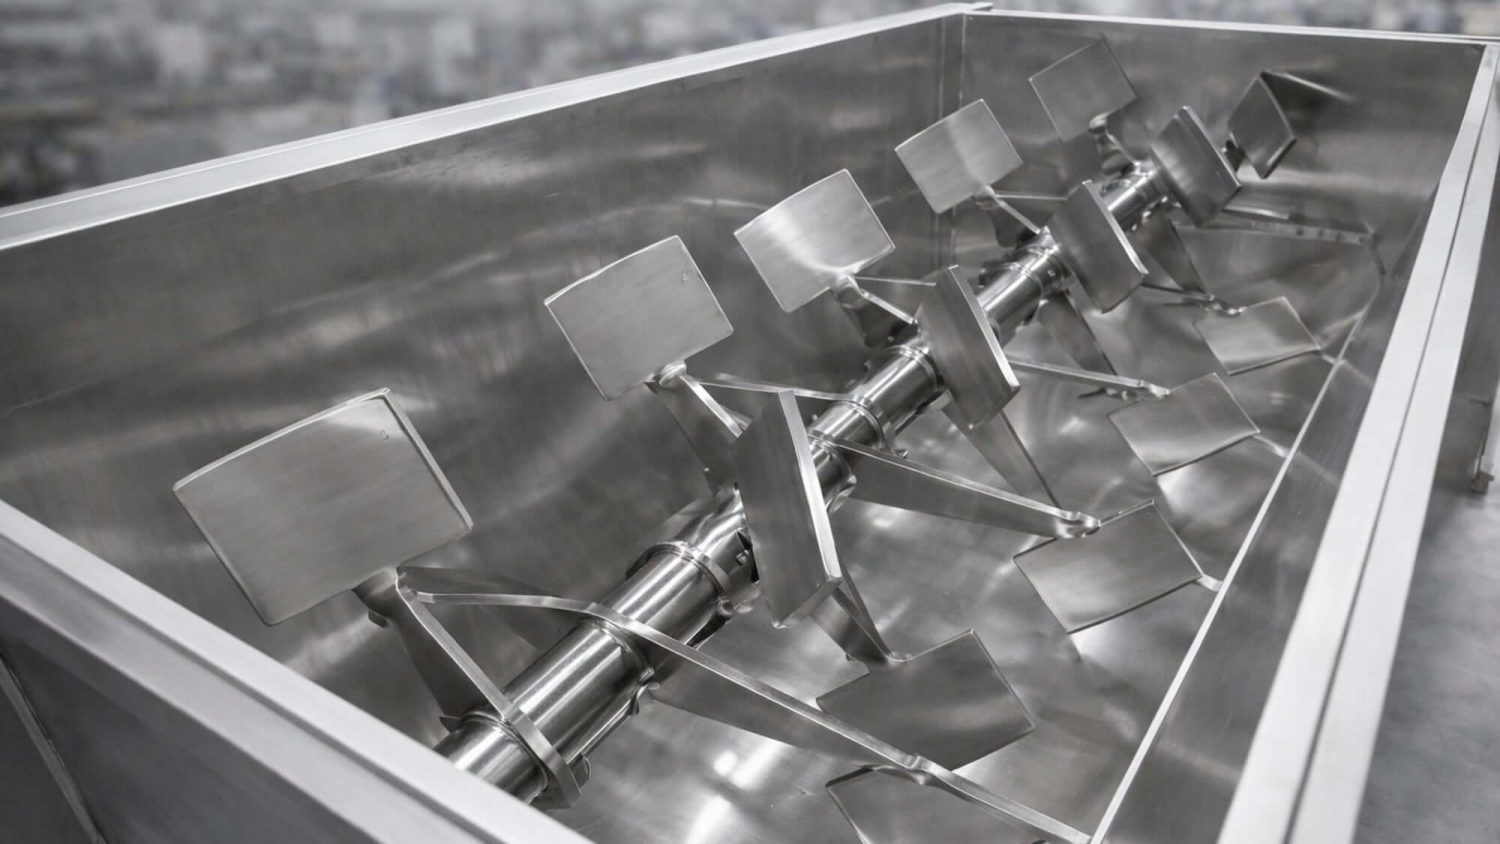
2. Paddle Blender
If you replace the ribbons with paddles, you get a paddle blender. These flat or curved paddles lift, scoop, tumble, and fold the product inside the trough. Paddle blending usually takes longer, but the action is much gentler. So they’re a great option for fragile products.
3. Hybrid Blender
A hybrid blender combines ribbons and paddles in one agitator. You’ll see an outer ribbon with inner paddles, or an outer paddle set with an inner ribbon, to push material in opposite directions. This design works well with free-flowing powders and slightly cohesive products. If you want one mixer to do both gentle and aggressive mixing, a hybrid is a solid option.
Ribbon Mixer Types by Vessel Shape
1. Horizontal Ribbon Blender
This type has a U-shaped trough that sits flat. It’s the most common style in food and pharma facilities. You can easily load material from the top and discharge from the bottom. This design works well with free-flowing powders and granules.
Because of the horizontal layout, this blender often has a relatively low profile and can be easier to integrate into production lines. Horizontal ribbon blenders can be built very large, so if you’re mixing bulk powders in high volumes, they are probably what you need.
2. Vertical Ribbon Blender
A vertical blender uses an upright, cone-shaped mixing vessel with a long spiral ribbon agitator inside. The ribbon lifts product up the walls, and gravity pulls it down in the center. This up-and-down circulation produces a very uniform mix.
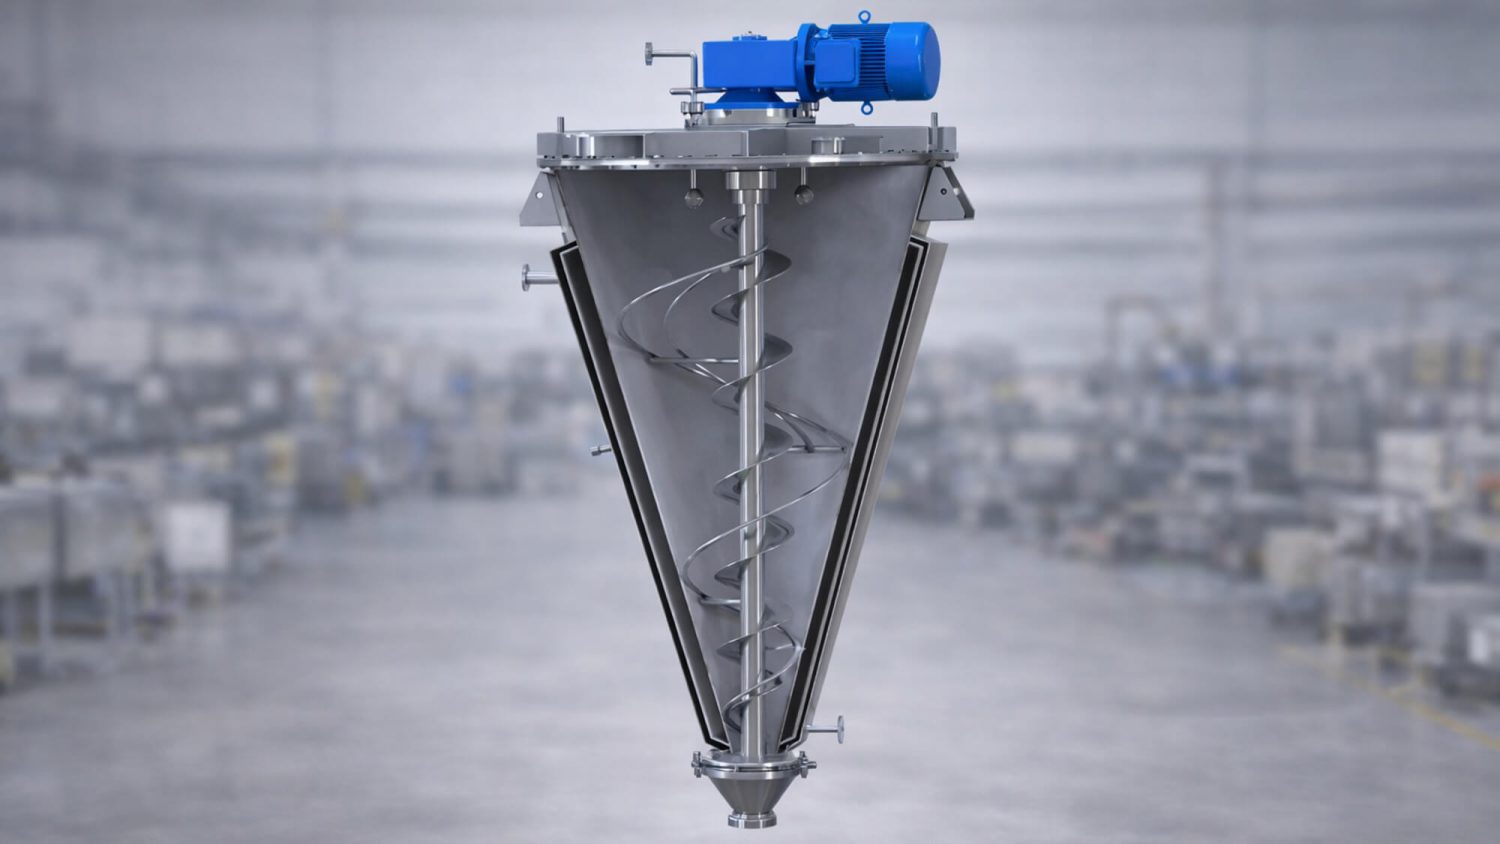
Because the mixing action is gentle, vertical blenders are a solid option for fragile or heat-sensitive powders. They also discharge well. And the upright design is very space-efficient for small floors.
Ribbon Blenders by Operation Mode
1. Batch Ribbon Blender
Most ribbon blenders operate in batch mode. You load a measured amount of ingredients, mix them for a set time, then discharge the entire batch. After that, you clean the blender for the next run. Batch ribbon blenders are very flexible because you can change formulas between batches.
2. Continuous Ribbon Blender
But if your line runs one product and you need steady output, a continuous ribbon blender is a better fit. This type usually has an inlet and one end and an outlet at the other. It’s integrated in the line, so materials are continuously fed in, mixed by the ribbons until getting uniform, and discharged to the downstream.
Ribbon Mixer Types with Special Features
- Jacketed Ribbon Blender: If your mixing process needs heating or cooling, a jacketed ribbon blender is a common solution. Its trough is built with a double wall. Between the walls, you can circulate hot oil, steam, or chilled water to heat up or cool down the product as it mixes.
- Twin-Shaft Ribbon Blender: This design uses two shafts within the trough. Each shaft has its own ribbon or paddle set. That means it’s a dual-agitator setup. It provides more aggressive mixing and can handle heavier loads.
- Vacuum or Pressure Ribbon Blender: This type uses a heavy-duty sealed cover and a reinforced trough to handle pressure changes. All openings are tightly sealed, so you can pull a vacuum without leaks. This also keeps any dust or vapor inside. It’s great for mixing oxygen-sensitive materials.
Key Ribbon Blender Parameters That Affect Mixing Quality
To get a truly uniform blend, you need to balance these factors when running your ribbon blender.
1. Fill level: Around 40-70% of the blender’s total volume. Ensure the powder level at least covers the inner ribbon. If you overfill, the ingredients can’t move around freely. If the blender is too empty, the ribbons can’t pick up the material effectively.
2. Mixing time: As mentioned earlier, there’s an optimal mixing time for every batch. Most ribbon blender batches take only a few minutes to reach uniformity. Ribbon blenders aren’t high-speed, so running for way longer usually won’t improve mixing.
3. Mixing speed: Ribbon blenders run slowly, typically in the range of 15 to 50 RPM. For example, around 50 RPM is a standard operating speed for a blender in the 500-2000 L range. Too slow, and materials won’t circulate enough; too fast, and you might just end up with damaged material.
4. Ingredient addition sequence: Let’s say you have a 1% ingredient. Do not dump it all. Add half of your base powder first, sprinkle the minor ingredient over it, then cover it with the rest of the base powder, like making a sandwich. If liquids are needed, dry mix the material a bit, then spray the liquid in while the mixer runs.
5. Ribbon design: In a good blender, the ribbons are well-shaped and leave only a small gap to the trough. That helps sweep material and prevents dead zones for more efficient mixing.
Common Ribbon Blender Mixing Problems and Troubleshooting
Here are issues you are likely to see on the shop floor and ways to address them.
| Problem | Likely Causes | Fixes |
| The mix is not uniform. | The trough is overfilled or underfilled. | Check if the fill level is 70-80% full. |
| The blender runs too fast or too slow. | Adjust the speed as recommended. | |
| Ingredients are not loaded properly. | Spread small ingredients across the batch or layer them. | |
| The mixing time is too short. | Blend a bit longer and test again. | |
| There are lumps in the mix. | The liquid is added in one spot. | Use spray nozzles or sprinkle the liquid at multiple points. |
| The powder is sticky or damp. | Add the liquids slowly while mixing. | |
| The shear force is not enough. | Use a hybrid ribbon-paddle blender or add chopper blades. | |
| Ingredients get damaged. | The mixing takes too long. | Stop as soon as the blend is uniform. |
| The agitator runs too fast. | Reduce the blender’s RPM if possible. | |
| The ribbon agitator is too aggressive. | Replace it with paddles. | |
| The blender jams. | The batch is too heavy or dense. | Reduce the batch size or follow the rated capacity. |
| There are foreign objects inside. | Stop the blender and remove any objects. | |
| Mixing is taking longer than expected. | The batch is too large or too small. | Adjust the batch size to match the working volume. |
| The mixing speed is too slow. | Run the blender a bit faster. | |
| There are dead spots in the blender. | Check the ribbon condition and clearance. Replace or repair if needed. | |
| Powder leaks or dust escapes. | The seals are worn or loose. | Tighten or replace them. |
| The lid is not closed well. | Check the gasket and close the lid tightly. | |
| The finished blend is not fully discharged. | The outlet is not in the main mixing zone. | Use the center bottom for discharge. |
| Powders stick on the trough walls. | Keep the agitator turning slowly during discharge or use compressed air to remove them. |
Quick Ribbon Blender Selection Checklist
Now that you know how a ribbon blender works and the main types, let’s use a quick checklist to help you choose the right one.
- If you need gentle powder blending, consider:
- Single ribbon blenders
- Paddle blenders
- Vertical ribbon mixers
- 👉 They have lower shear and protect fragile granules or sensitive actives.
- If you need steady output for long runs, look at:
- Continuous horizontal ribbon mixers
- 👉 They can be combined with feeders and downstream packaging to ensure a smooth production flow.
- If you need temperature control, choose:
- Jacketed ribbon blenders
- 👉 They can mix powders, granules, and even pastes while heating, cooling, or drying them.
- If you handle dusty, solvent, or oxygen sensitive material, go for:
- Vacuum or pressure ribbon blenders
- 👉 They feature tight covers and dust collection ports and can mix and dry material under reduced pressure.
Not sure where to start? Reach out to Anxine, and we’ll help you narrow down the best option for your process.


